
 Ok....I've been pretty brain dead lately so forgive me on that title.
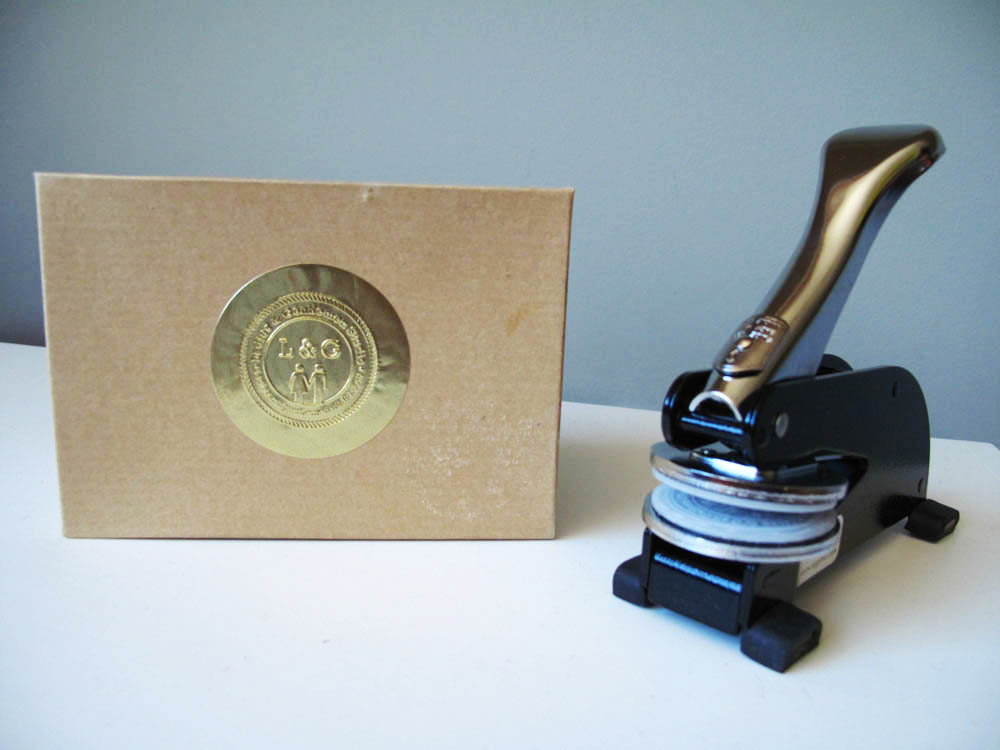
Yup still frantic getting ready for NYIGF but just had to share this little excitement that we'll be bringing with us!!
It's our own special L&G embosser!
We've always been wanting to use one of these babies whenever we find old notary embossers....so this was a perfect frivolous to get, and we're already getting a good use out of it!!
I used it on envelops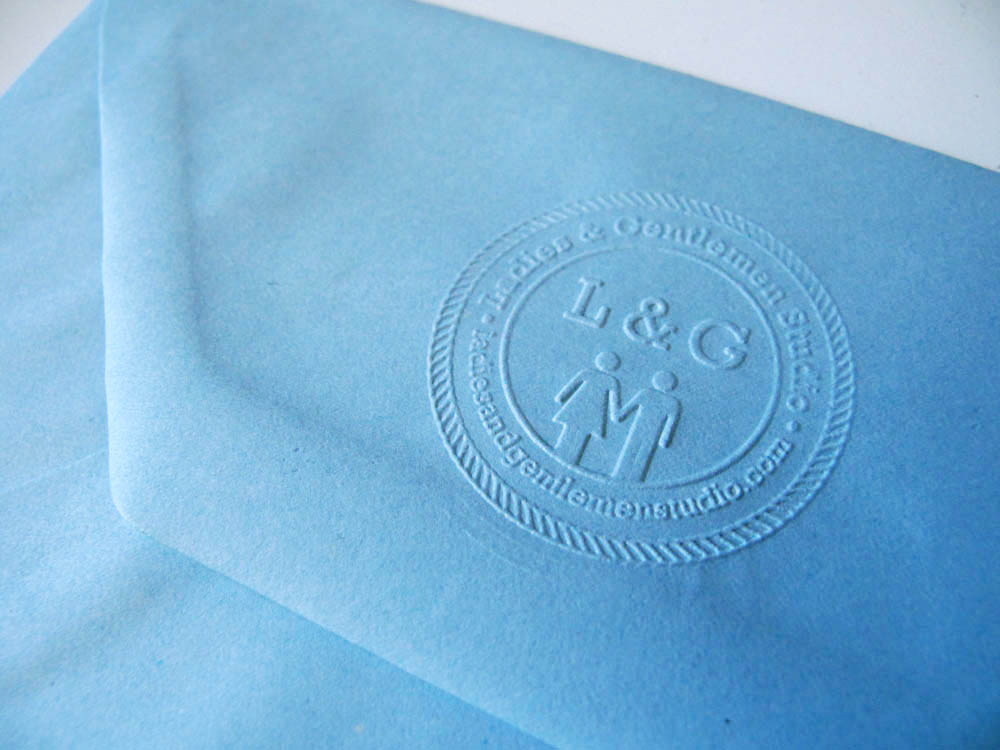 vintage postcards...
 why gold stickers of course!
 napkins... I mean..why not, right?! I can spend all day embossing a pile of these.
I might as will emboss a whole roll of toilet paper! Yeah.... I'm all about doing things in the least time efficient & least economical way. Dylan asks why I do the things I do...like spending too much time writing a blog posts, why we're spending more for vintage postcards and still have to print them and now...embossing several hundred individual business cards & stickers. He tries to suggest that we should focus more on bigger priority things and manage our time better, but I just ignore him when he says stuff like that and pretend that I didn't hear it. I'm sure he does the same thing sometimes, too.
So it's mutually acceptable. :)
Viewing entries in
L&G Project

Ladies & Gentlemen Studio (yup! that's us!)
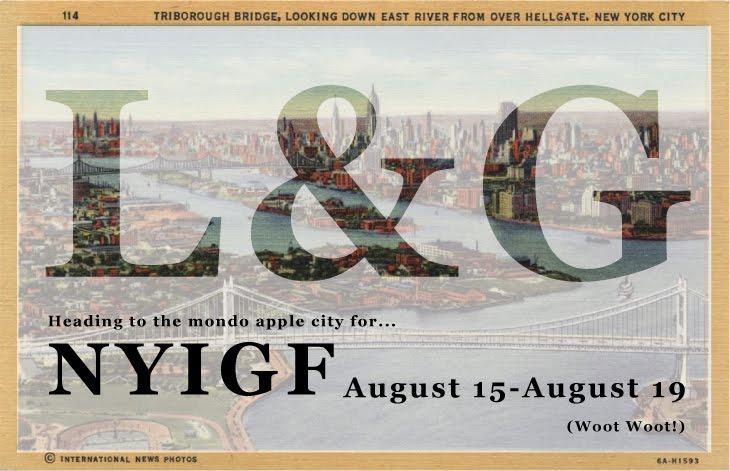
L&G is frantically gearing up to head over to NY for the upcoming New York International Gift Fair (NYIGF) this August 15-19th. Part of the main reason we're even able to do this is because JOIN:Design Seattle!
We'll be debuting our original items for the first time along with 9 other wonderful studios from the Northwest and represent! Woot! Woot!
We'll be debuting our original items for the first time along with 9 other wonderful studios from the Northwest and represent! Woot! Woot!
On top of all this, we were able to get our amazingly talented photographer friend Kyle Johnson to do wonderful portrait shots of each studio for the press release & JOIN catalogue. Check them out! I just love seeing everyone's spaces and how Kyle really captured every personalities. Pat on the back for Kyle!
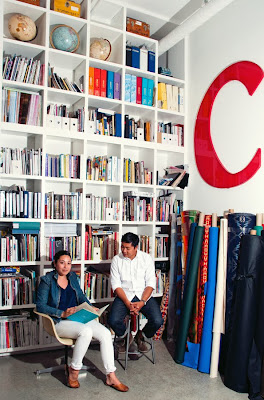
 Iacoli & McAllister (and Mies!...that white furry ball of cuteness on Jamie's lap!)
 Grain ( we're still jealous of their studio/home on Bainbridge!)
R&L Goods (aka randL/Chikabird....yay! no more name confusion! Chika & a clone of myself.)
 BlkPine Workshop (also owners of Maiden Noir, Cafe Weekend, and too many other things)
 Erich Ginder (and his new adorable little baby girl!)
 plainMADE (excited that I just ordered one her amazing silk scarves!)
 BlkPine Workshop (also owners of Maiden Noir, Cafe Weekend, and too many other things)
 Erich Ginder (and his new adorable little baby girl!)
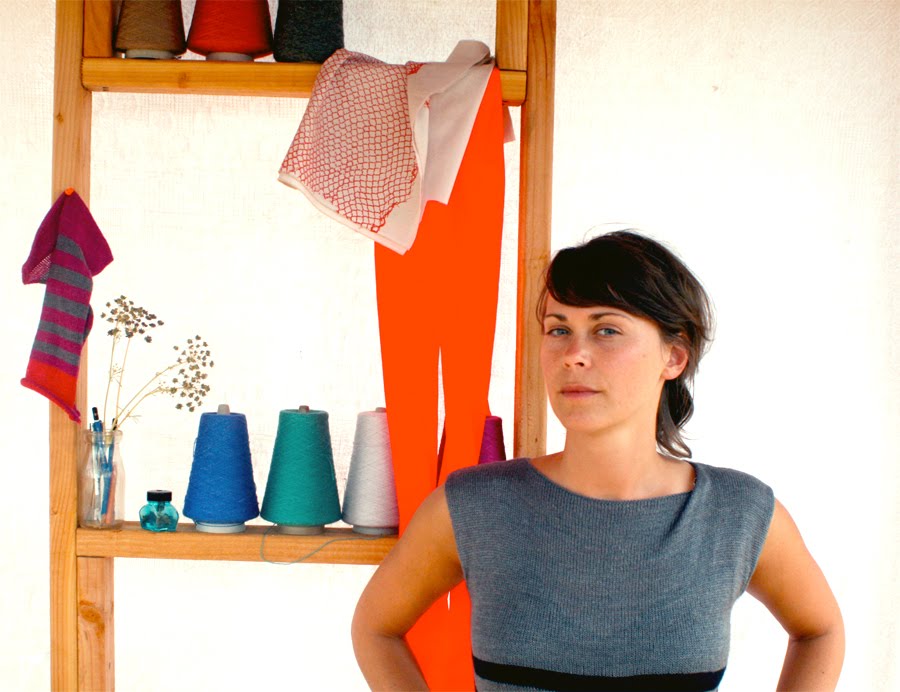 plainMADE (excited that I just ordered one her amazing silk scarves!)
Urbancase (Just look at them amazing wood he uses for his furniture...)
 Free Time Industries (I just love the colors of this entire photo and their outfits!)
Can this get any more exciting?? Actually I think exciting doesn't quite cut it.....this is gonna be EPIC!
 So as you know we've been bustling our little piggy behinds on bringing these little piggy to the market. The NY market at the NYIGF to be exact!!
Based on what we learned from our slip casting class....we realized there's a reason why humans make machines like 3D printers so we don't ever have to make imperfect models from scratch! 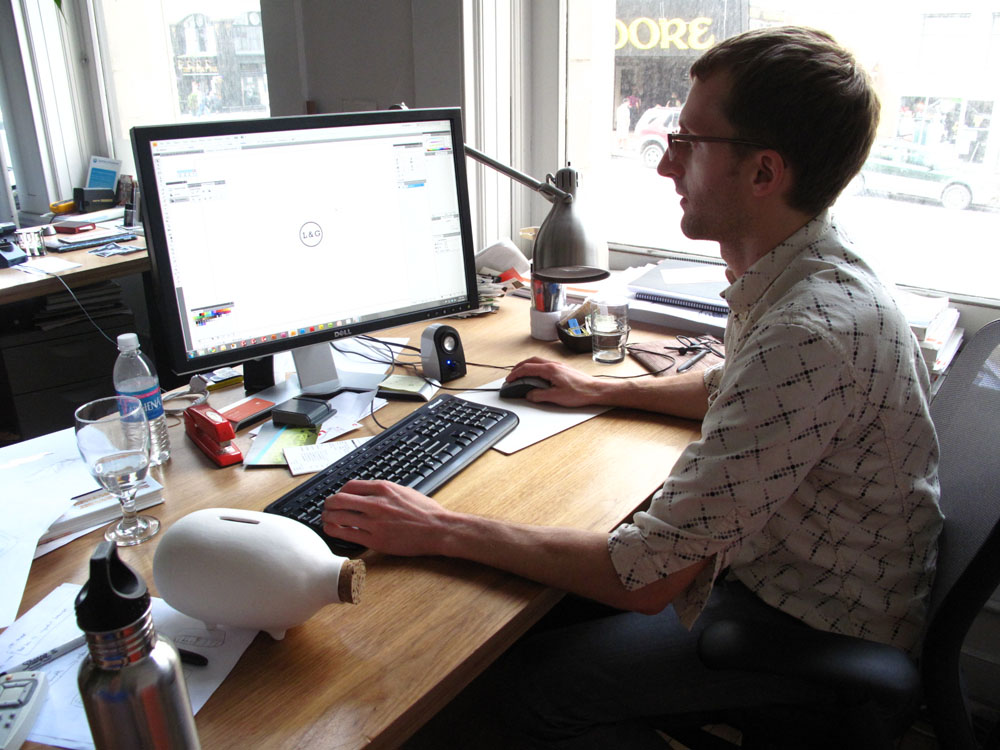 Thanks to our duplex mate/friend & confidant/pro Solidworks user, Jared of General Assembly was able to help us draw up a perfect Chalk-it-to-me Piggy Bank model!! But also his office just invested in a new 3D printer and so we got to try it out and also see the magic birth-giving/clone-making of our version 2.0 piggy bank!
Here's the version 1.0 piggy accompanying Jared while he drew it up on Solidworks. I'm still proud of us for making the first piggy from scratch, but there's just still too many imperfections of uneven bumps and surfaces that we didn't feel okay taking it to the market with it... :(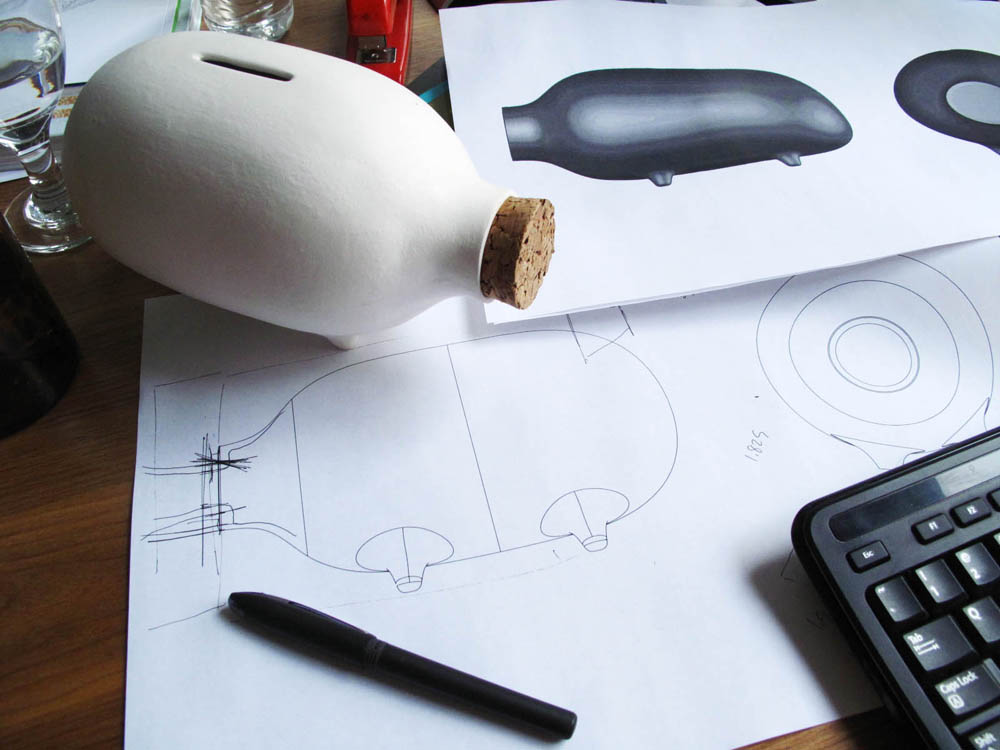 Here's a rendering of version 2.0 piggy on the screen....ahh....so perfect and smooth looking....
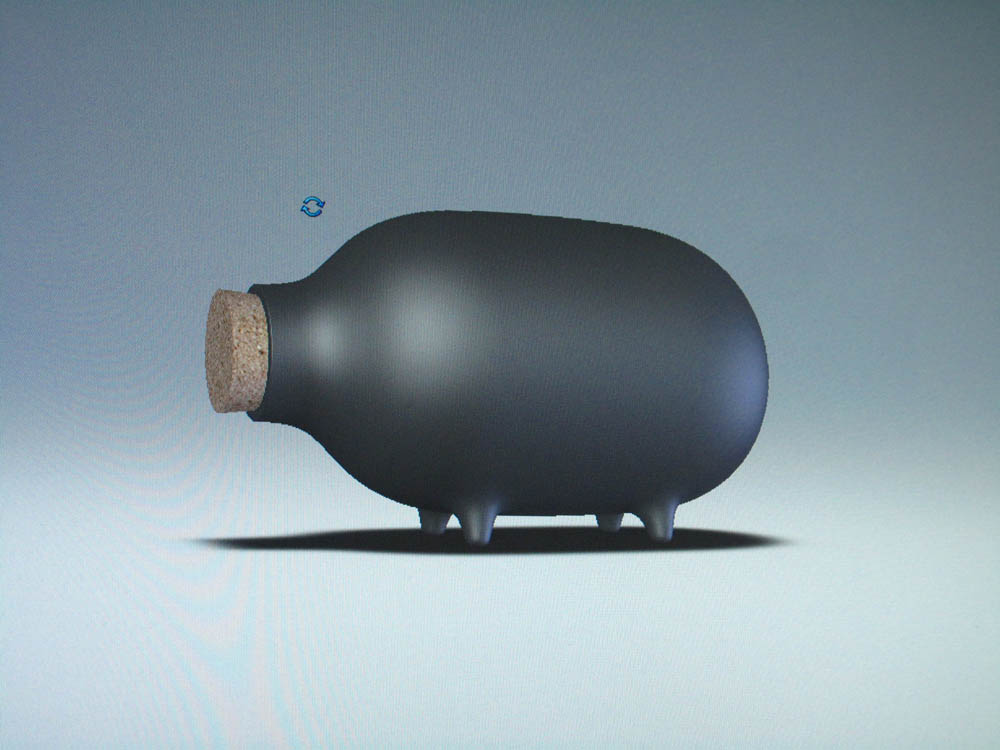 After much tweaking and refining of version 2.0 piggy. Jared sent it to their magical robot 3D printer...where it literally spews out a liquid resin material and prints it layer by layer in .00000000001 mm (a little exaggerated, yes, but you get the idea ) layers and builds it from bottom to the top like a topographical map.
Here's the cloning of the pig in the machine. (play some sort of sci-fi soundtrack) After almost 24 hour of straight printing we got the first half of version 2.0 cloned piggy! I could have stood there watching it the whole time if I could since it was so mesmerizing to look at....
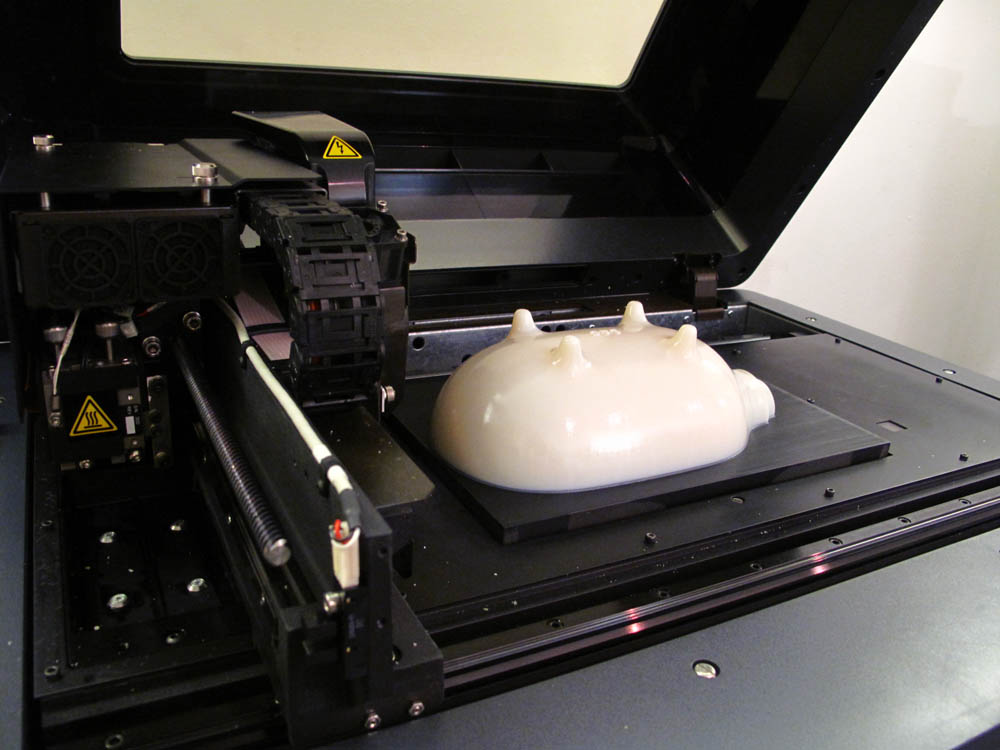 We even got our logo integrated on its belly! It just totally blows my mind what computers & machines can do!! I freaking love machines!!
 Here's Dylan with second new born!! ...just the first half of it.
  Here' are the two halves getting primed and wet sanded so they'll have even more perfectly smooth surfaces...like a baby's tush. :)
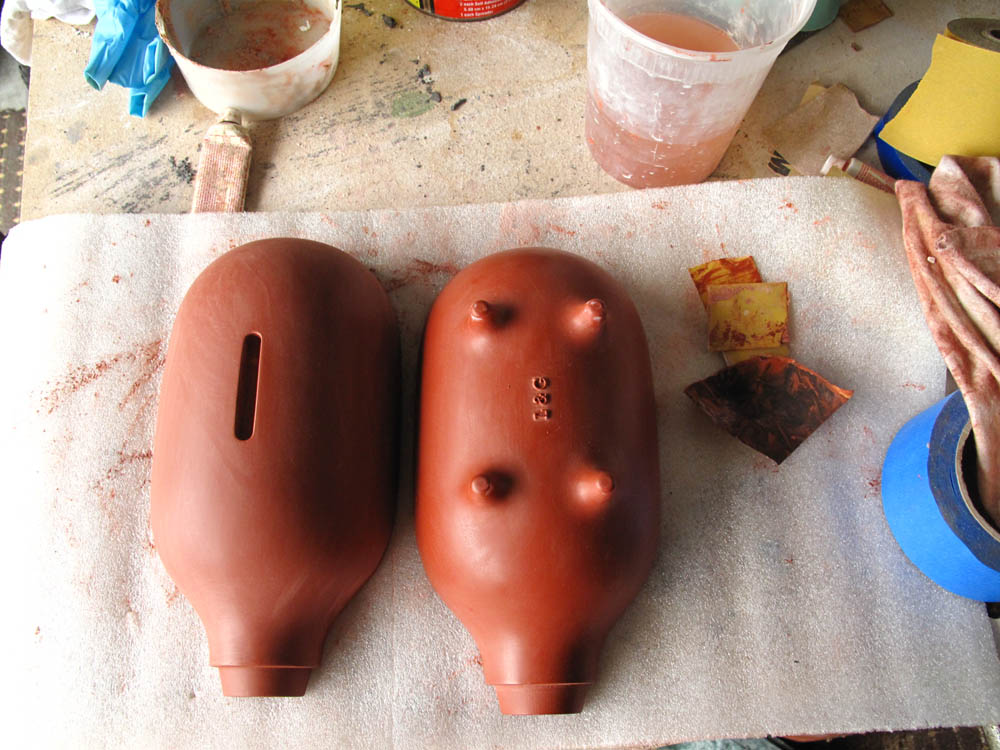 Here's a comparison photo of the first piggy. Granted the first version has its own personality and charm, I think the second version's refined contours and proportions is bringing it to a higher level of awesomeness! But we still love version 1.0 piggy just as much as despite its slight flaws!
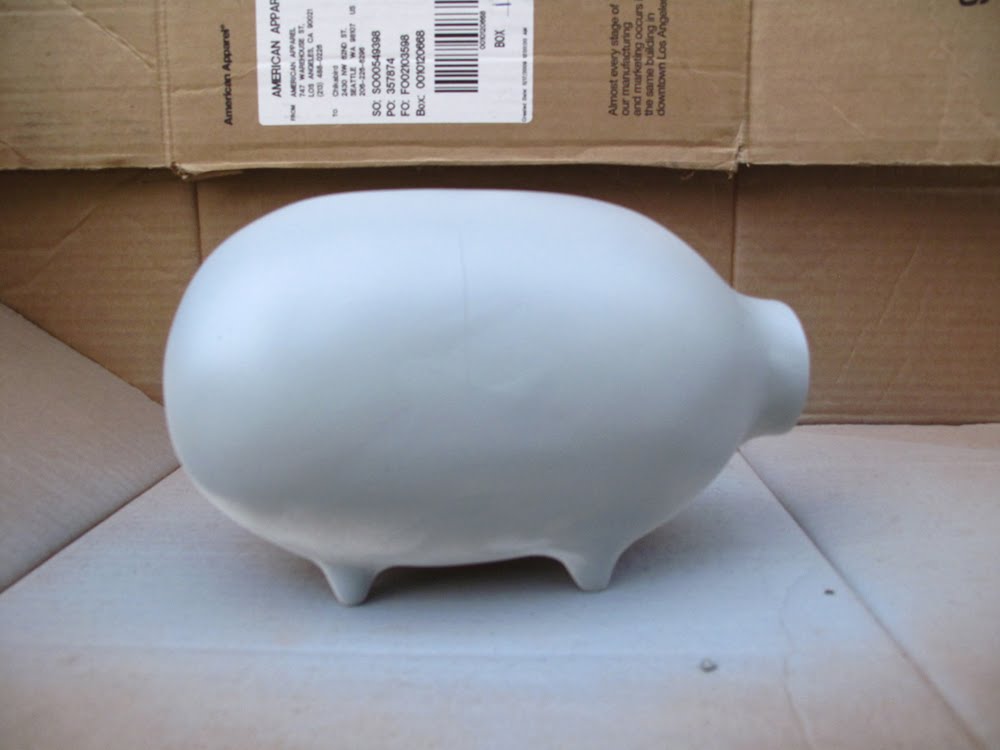 ...and here it is!!! Version 2.0 piggy master model!
 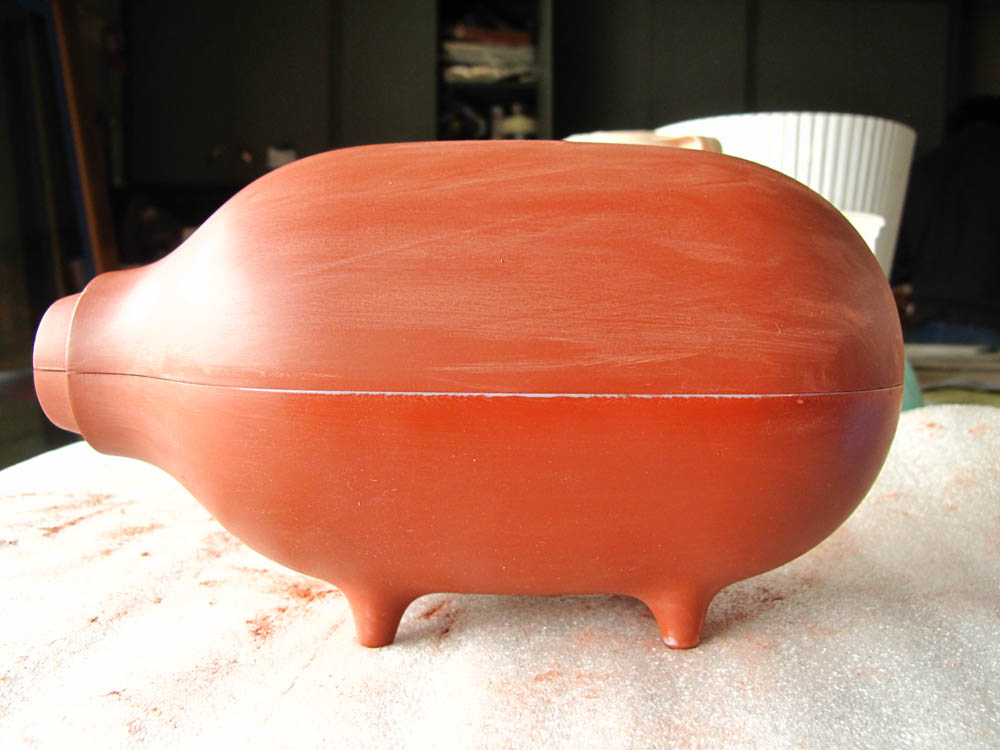 We're so thankful of all the hard work and the hours that Jared has put in to help us making all this happen!! We wouldn't have been able to take the pig to market if it weren't for all Jared's awesomeness!!
Now we just have to see how the real slip cast ones will turn out!!
Can this get any more exciting....and the answer is....YES of course!
Here's our third update on our slip casting process!!
Last post was all about making the master form and the mold. I know....totally boring....but now the really fun part where we actually get to make real things!!
Here's how it goes:
The 2 part plaster molds are held together by couple of thick rubber bands. Once assembled, pour pre-mixed, pre-configured clay slip into the mold. Start timing! It's pretty amazing how primitive this whole process is, but it totally works!
So here's Heath pouring slip into one of his molds.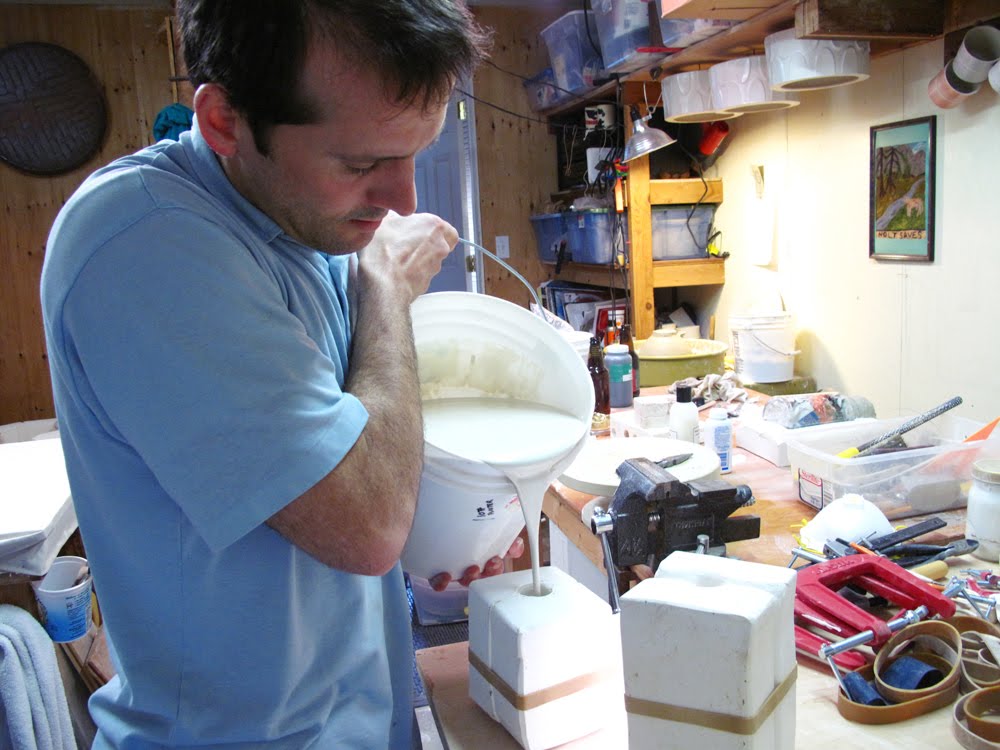 Here's my little gem shaped mold with slip poured in.
The slip sits in the mold and the plaster in the mold eventually absorbs the water from the clay. This will harden the clay body and create a wall thickness all around the shape inside. Once it achieves the ideal wall thickness, we pour out the rest of the slip and just let it sit for a bit!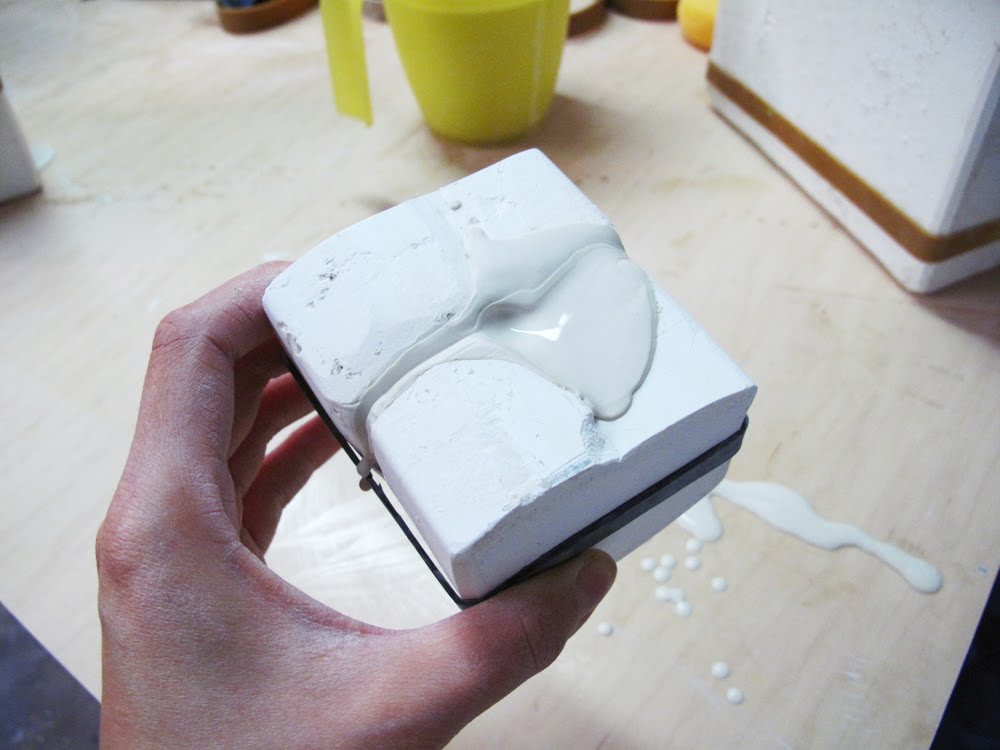 Here we have Dylan trying to blow in the mold thinking it would speed up the drying process....but that's not proven to be very time efficient.... So do not follow his technique. :P
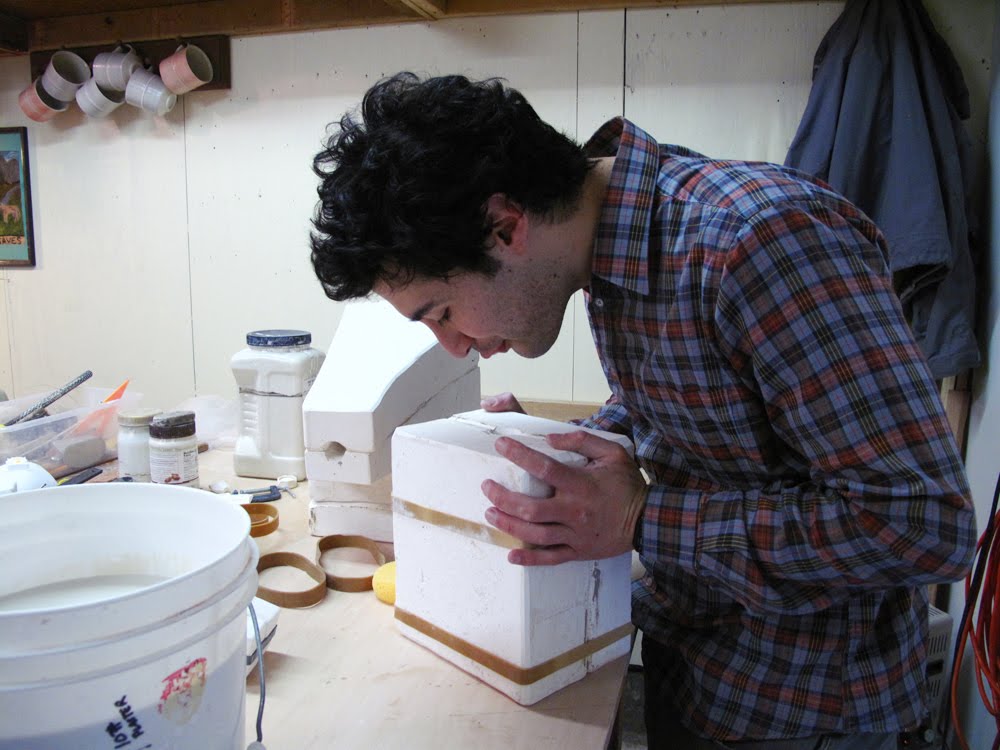 My slip cast gem taken out of the mold after the clay had hardened. You can see where the pour spout and the parting line is where the molds met. All that has to be trimmed and cleaned up afterward. This is the fun part for someone who's a little OCD like me....it's a totally gratifying step to just use some tools to trim and clean everything up so it looks all nice and neat!
 And here are some finished trimmed gems & critter paws!
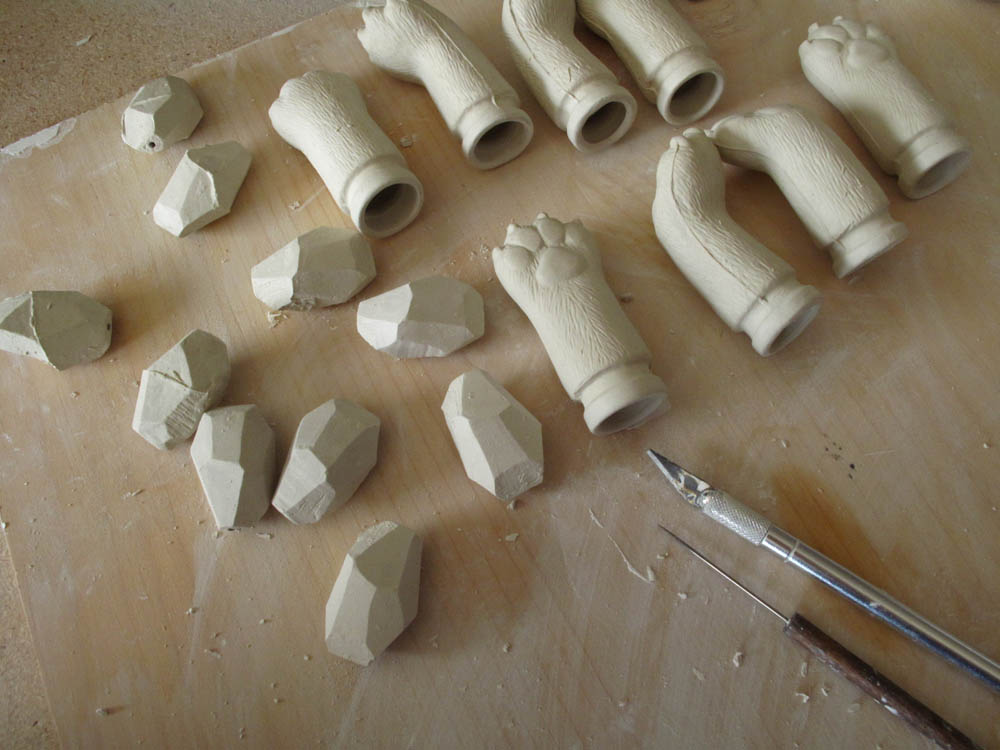 .....and here's our first trimmed piggy!! YAY!!
OUR FIRST BABY!! I've never had a baby...but considering how much I had to go through to get this baby out, I'd imagine the feeling of accomplishment and love is similar to delivering an actual one.....I'm 95% positive...
Except this baby saves money....unlike a real human baby which in contrast would COST a lot of money...I hope this baby pig will be a good investment. :)
So here's our first batch of some fired pieces!! I can't explain how awesome it is to be able to start with some liquid clay and end up with finished products that we designed! It just totally makes me really appreciate the art of slip casting. Even though it's more of a production process, it still required so much time & care in every step of the process to make it nice. 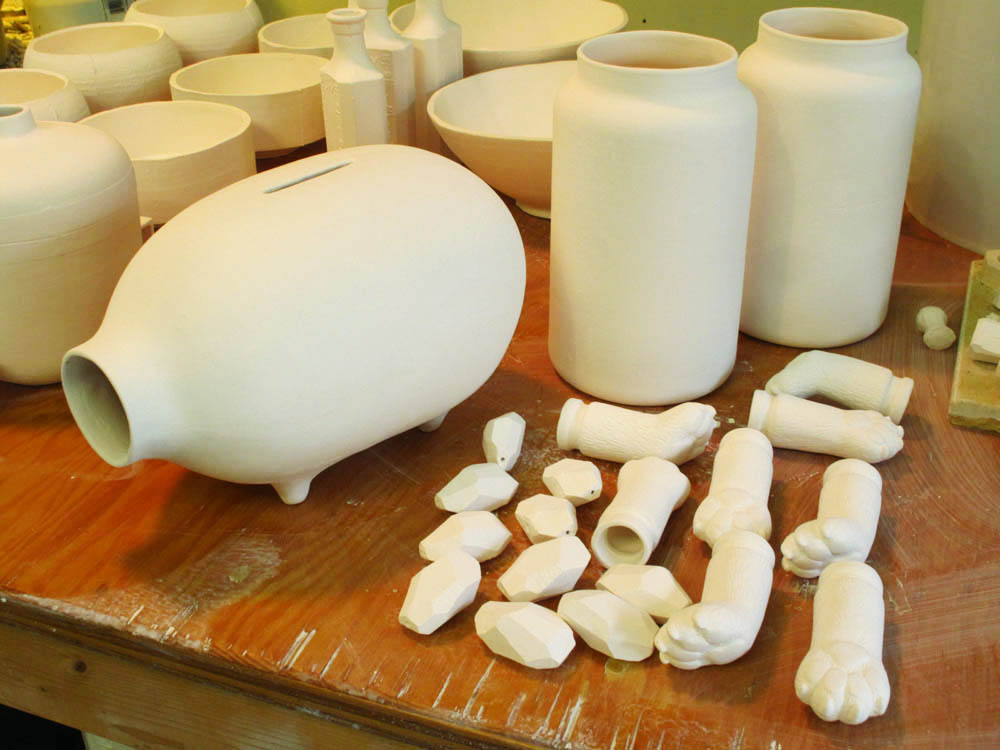
 And finally....a finished & glazed piggy! WOO HOO!!
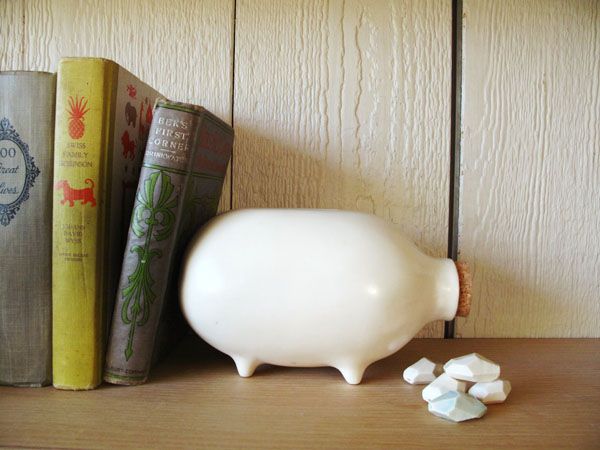 We didn't have the right type of black glaze for this first one....so just glazed it white. So this one still isn't the real deal (Sorry for all the build up)
But I just feel the need to share this one because it is our first child!! Yes..we'll totally be the type of parents to take a BUNCH of photos of their first child and then don't bother with the second child...
We designed it with simplicity of form and function in mind...we want as much smooth surfaces to maximize the chalkable surface, also designed it so the pour spout (where we pour the slip) is actually the piggy's snout! Eh? You like that??
But really...we just wanted to make a simple mold that we can easily do ourselves. :D Granted this little piggy have cost us more than we want to think about...we still believe that it'll all be worth it in the end. We really hope we'll get our return when we launch the real thing at the NYIGF!! I'm keeping my fingers crossed!

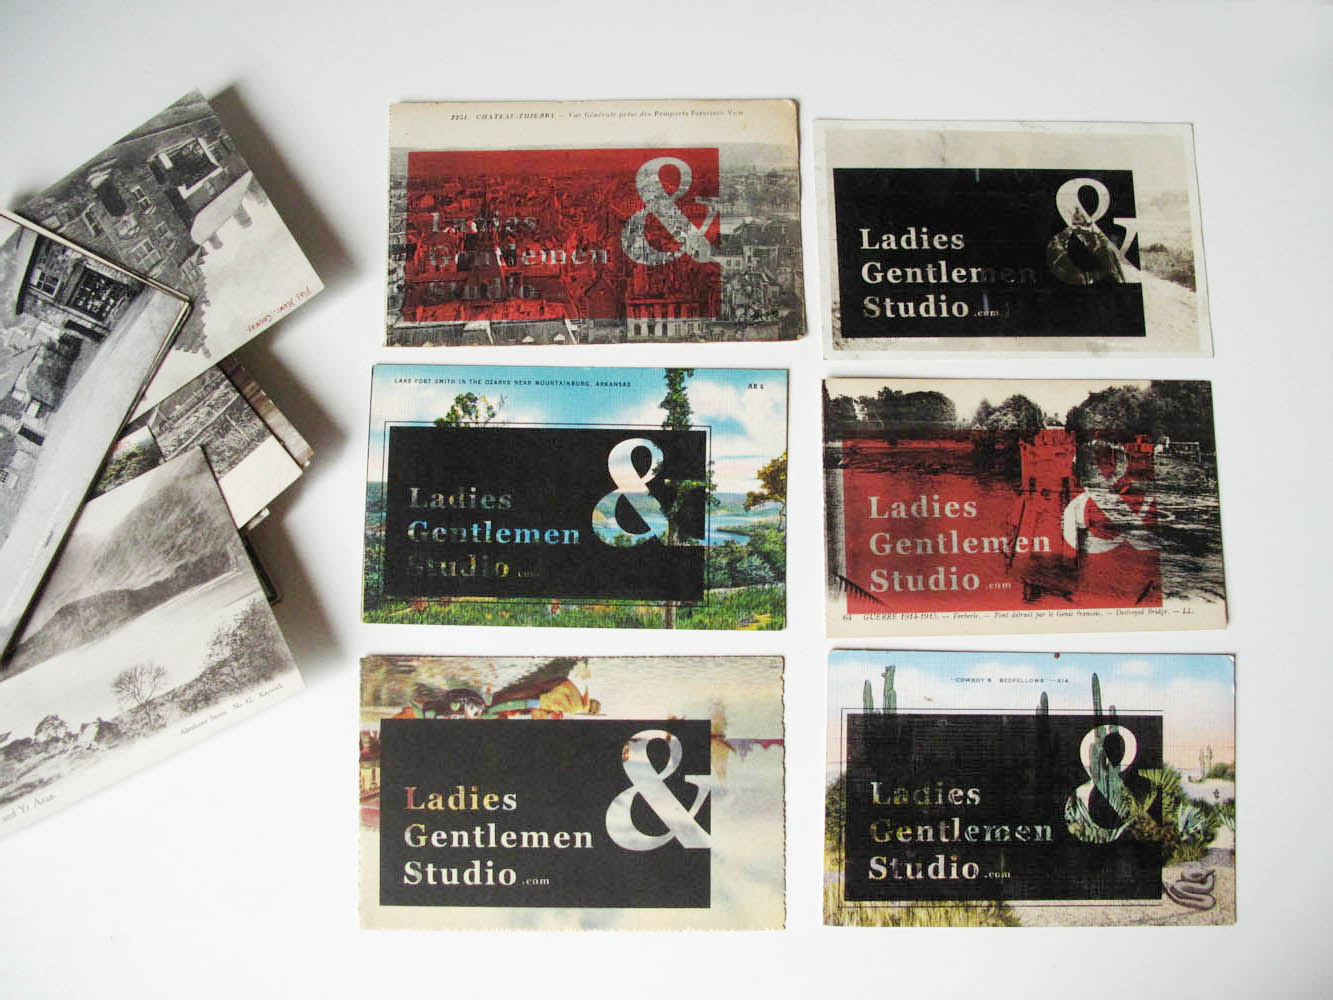 Despite the fact that the products we're planning on showing at the NYIGF aren't even fully flushed out yet, I've decided to jump ahead anyways designing our handouts & postcards. Even though there are other WAY more higher priority things that I should be doing...But I just can't help it...plus I need my instant gratification with small projects like this to feel more accomplished....
These are just some iterations....I'd like to silkscreen or Gocoo print over all these one of a kind vintage postcards. I just love the quality of how they feel, look, and....oh how I even love the slight dusty old basement smell! 
 I know spending time to print them individually for these postcards isn't the best solution in terms of saving time or money. But it's more satisfying this way to make something fun (at least for now!), plus it's all the small details that counts, right?
It's especially funny since I recently read this post from Chelsea of plainMADE doing the same thing where she's also printing her own postcards (they're beautiful though!)....and the idea of "impractical" labor.
I like that I'm not the only one being "impractical" and "ineffecient" :D 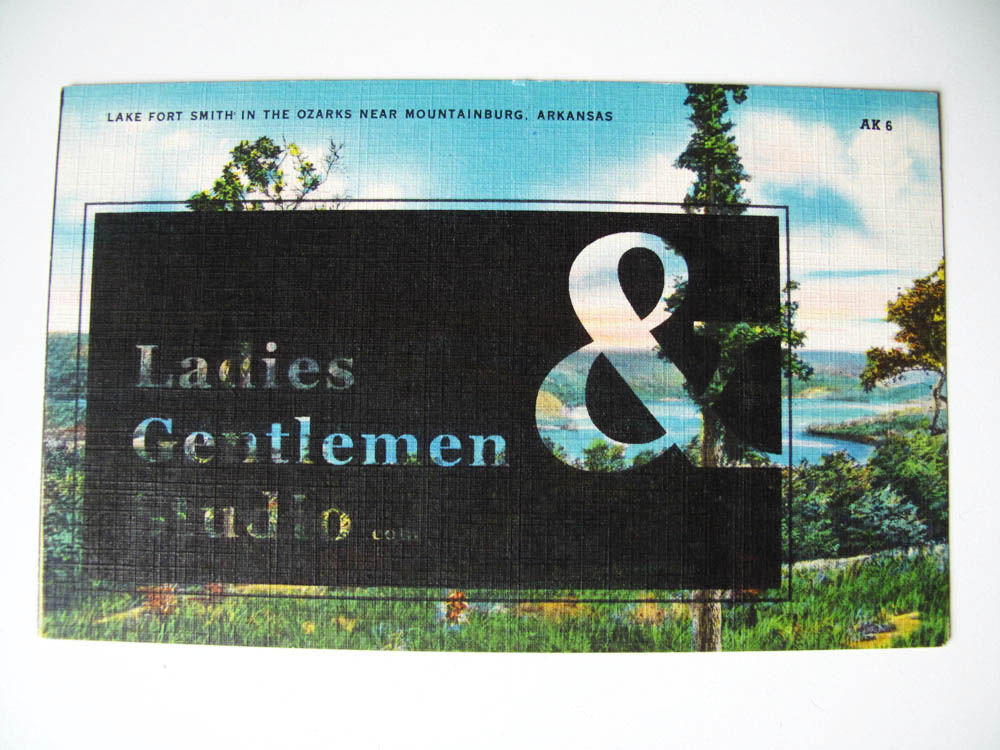 But really, there's no right or wrong about how to go about things like this. I think if ultimately someone grabs one of our postcards and feel the NEED to keep it because it feels more special, then all the work & time is well worth it!
I like the idea that whoever takes it will want to keep it for whatever reason and put our card on their fridge or inspirations board...or even if someone is moving and is going through their things that they'll look at our card and decides to put it in the keep pile amongst other valuable & inspirational photos/cards/letters and takes it with them.
Wouldn't that be nice?....I think so.
 We're sending out a small batch of Chalk Piggies to this adorable-looking kid design store in Toronto called KolKid. We wish that we're the ones going there since we've always heard great things about the city, the people...and the country in general.
I'm sure the piggies will be well taken care for once they're there and will most likely even get wonderful health care benefits.....I'm just happy to know that they'll have a wonderful life there.
Designing kiddy things has always been on our things-we-like-to-do-list....but that's opening another can of worms...but they'd at least be very cute worms.
Looking at the Kolkid webshop just make me want to start doing that! I just can't stand it!! It's all too freakin' cute!!
Perhaps someday more baby slippers...


 We've been a little too occupied and had totally forgot to mention that Dylan & I will be going to the New York International Gift Fair (NYIGF) this August 15th-19th to launch a few L&G original & Chikabird products!!
It's exactly a month from now...yikes!
Not only are we're excited that we'll be there showcasing our products in NY, we're also super fortunate to be in a booth amongst great talented friends of JOIN in the Accent on Design section!
All thanks to Jamie (co-owner of I&M and head organizer of JOIN) who got us involved in all this!!
Woot Woot!!
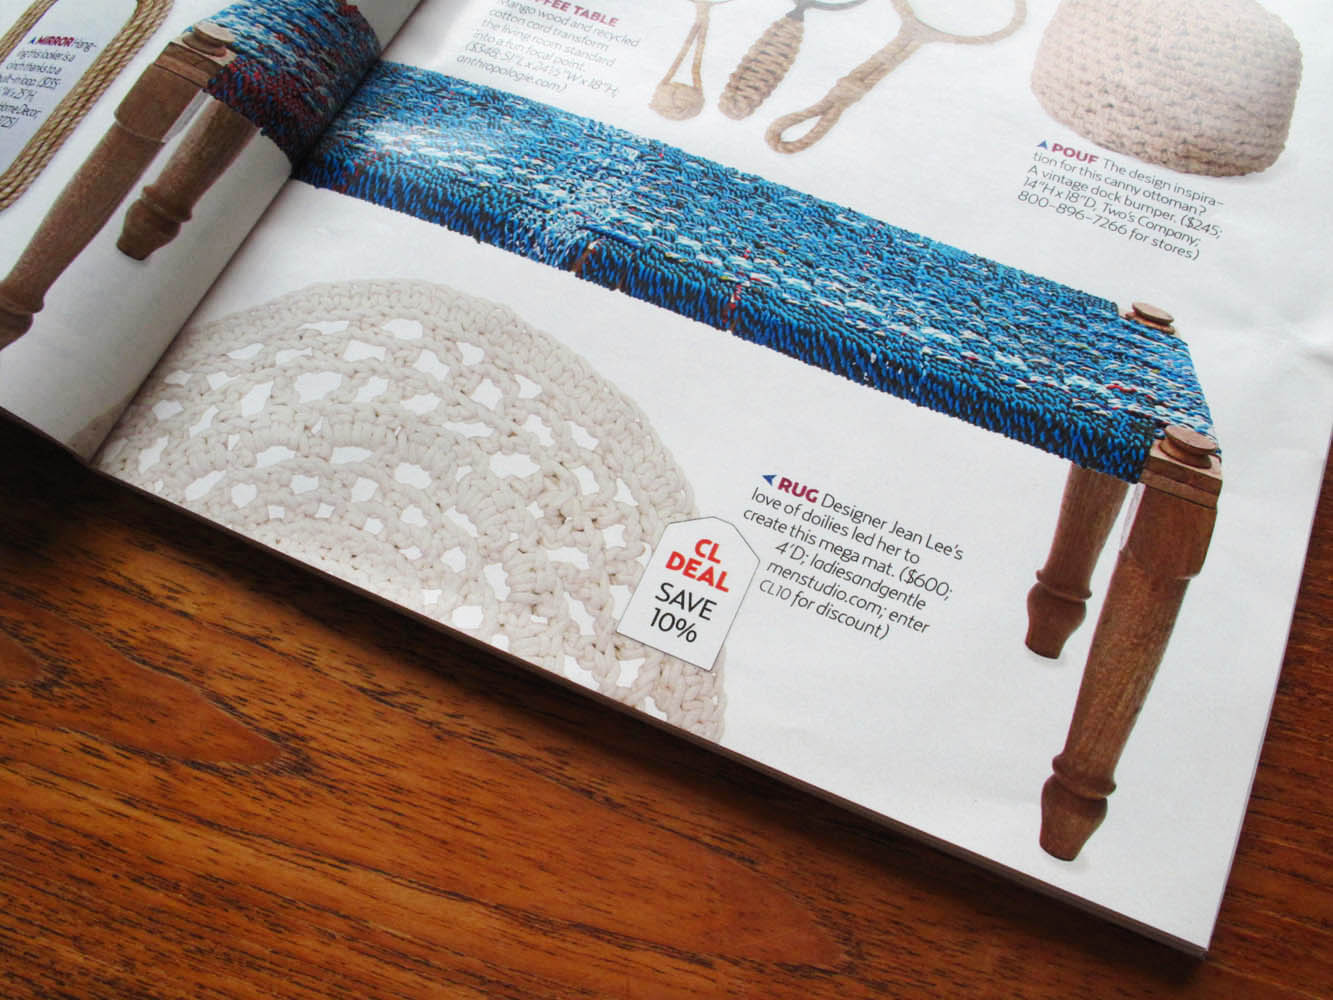
 L&G's Mega Doily rug is featured on this month's Country Living Magazine! Woot woot!
We're offering a 10% discount for the month! Just enter the discount code when checking out!
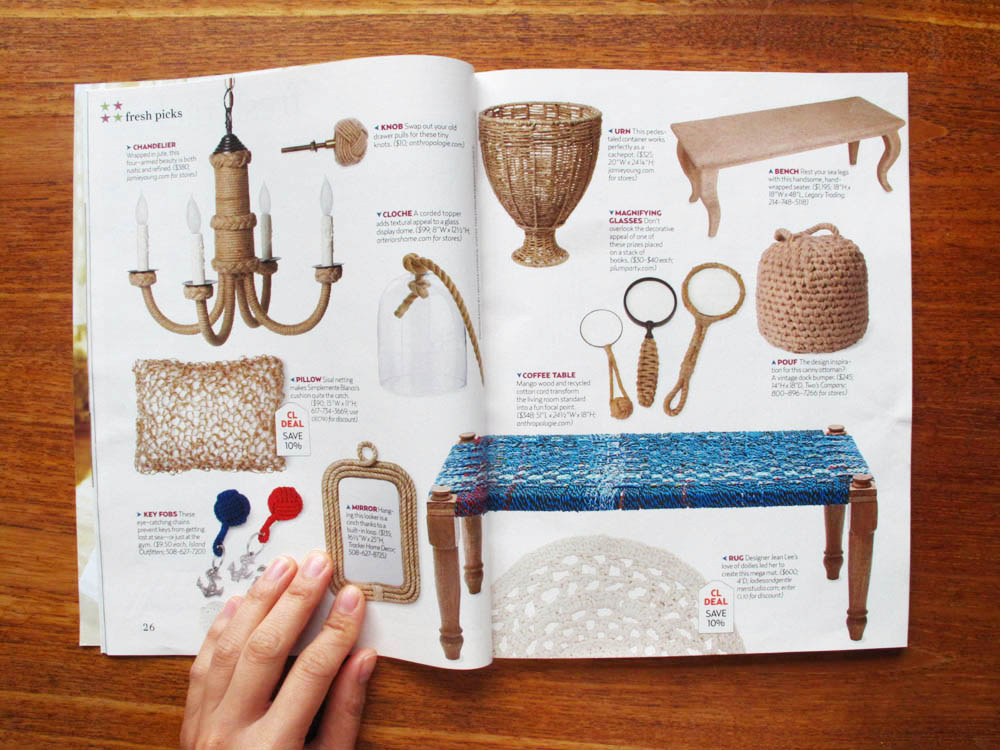 A nice spread of rope themed goods. I love those magnifying glass wrapped with jute!
Despite the unfortunate conclusion of our 8 week super-duper slip casting class, the slip-casting excitment continues. If you haven't been reading every single post we've written this year (shame on you!), the class taught us all the steps of casting from start to finish; the goal: to make ceramics mulitples of a form quickly, easily and awesomely.
For the class, we wanted to make something special for L&G and so we decided to create our own original L&G Chalk-It-To-Me piggy bank! Here's a little trip down memory lane of how this little piggy came to be:
 We quickly sketched up (I'm a great sketcher, right?) a simple & minimal piggy with a capsule-like form that I thought would be a nice easy form to cast.
From there it was as easy as 1, 2, 3!!
STEP ONE: Make a master form. In order to create the mold, we need to create a positive "master" pig that is an exact specimen of what we want our cast forms to look like.
Little did we know...the first step of making darn thing was a total ordeal. It didn't have to be...but I just ended up making it that way. Go figure...
I used my first instinct...which is to use our handy dandy laser cutter from Chikabird.
I figure I can draw the shapes in layers and build the form up like a topographical map! This was my way of it getting the form close to perfect versus just making it from clay. Clever right? But In cardboard....not so much. 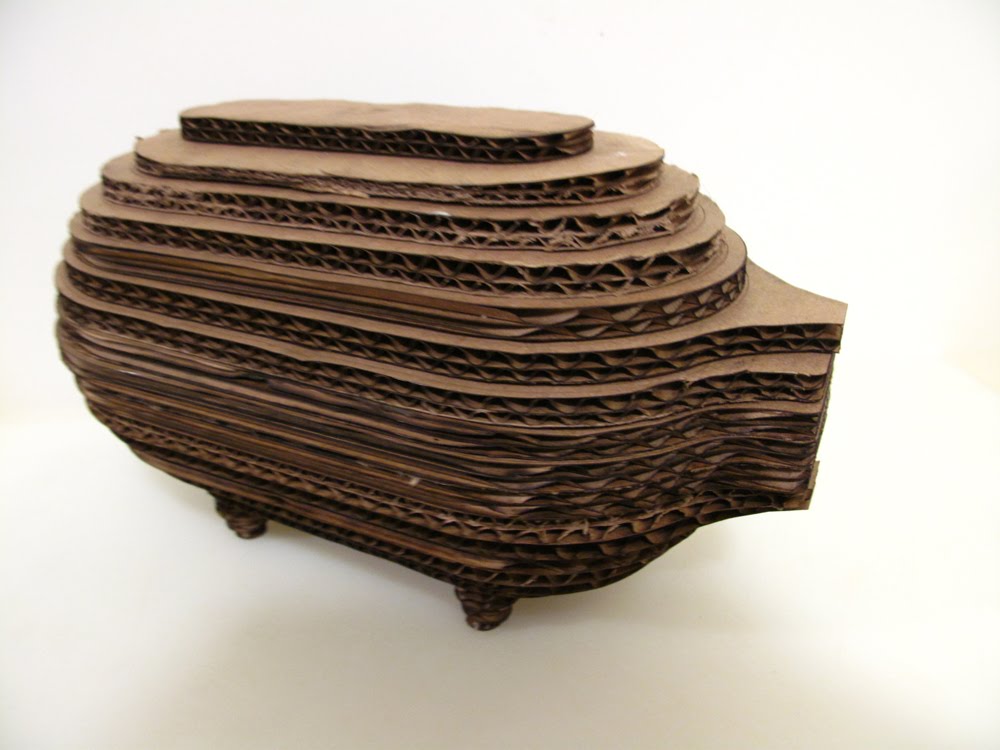 Now you're probably asking why the hell I used cardboard to build the form...that's a very great question. Well....I decided to use cheap-o Sculpey (craft 101 style) thinking that I can roll out the material and drape it around the form, then bake it and sand it afterward!
I thought it wouldn't be such a good idea to use acrylic for the laser form since it would melt in the baking process...and so why not plywood you ask? Well, honestly... I don't know! Why didn't you mention that BEFORE I started making this?!?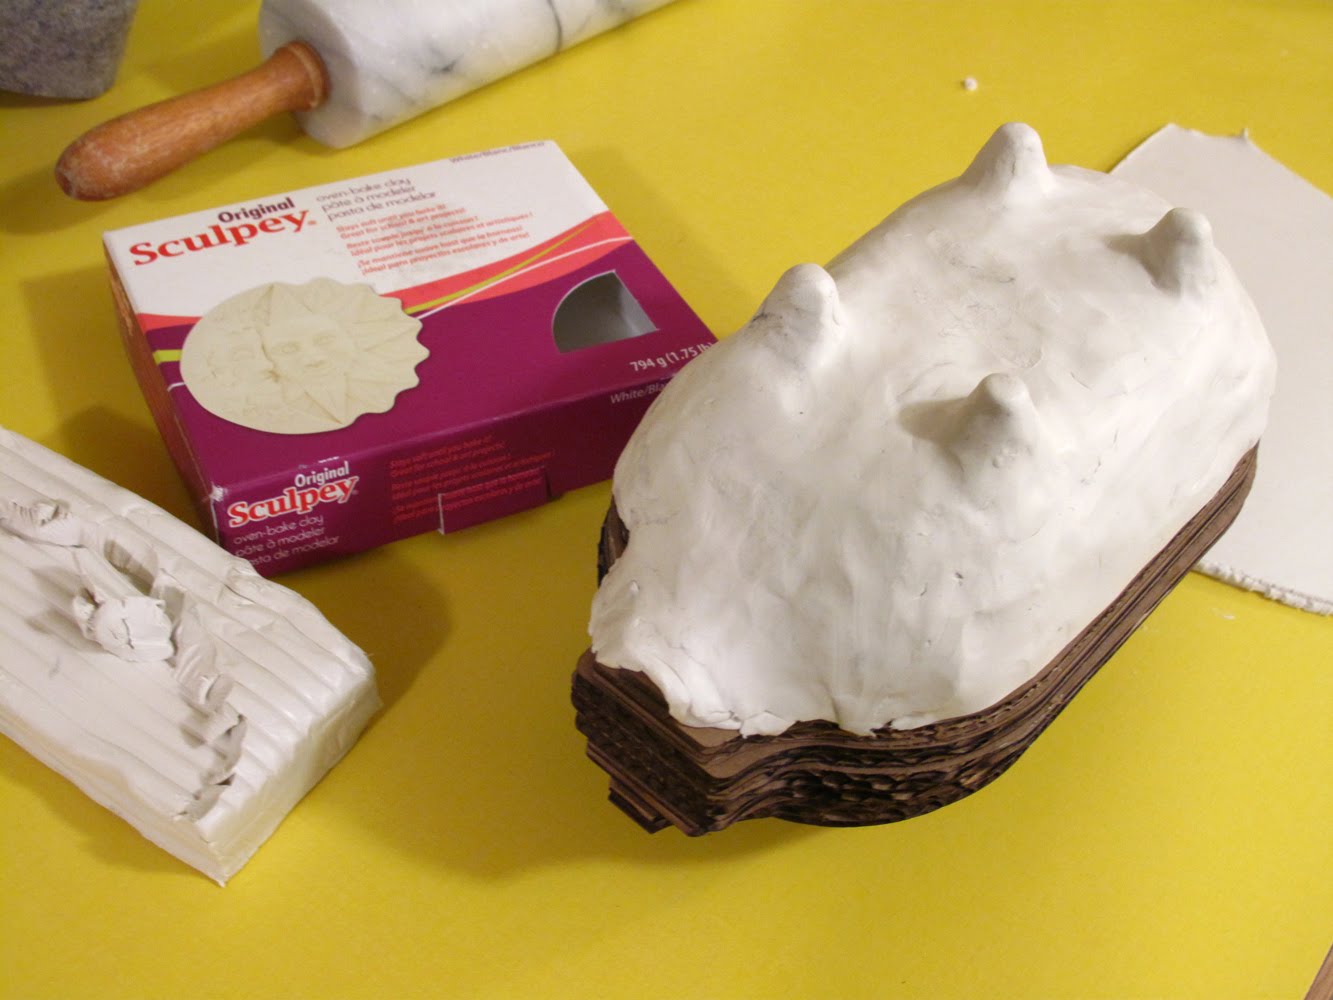 So here it is with the Sculpey draped over. I think the last time I used Sculpey was in middle school or something. I realized there was a reason for that...this stuff is horrible to work with!! Its too soft and I kept making finger marks all over as I was handling it.
 After going through the baking process, the rough piggy form was made. But then somehow there were little cracks that formed because I either baked it for tad too long or there were areas that were too thick! UGH! But by that point, it was no going back, those cracks could be easily filled right?...can't you just feel the suspense?
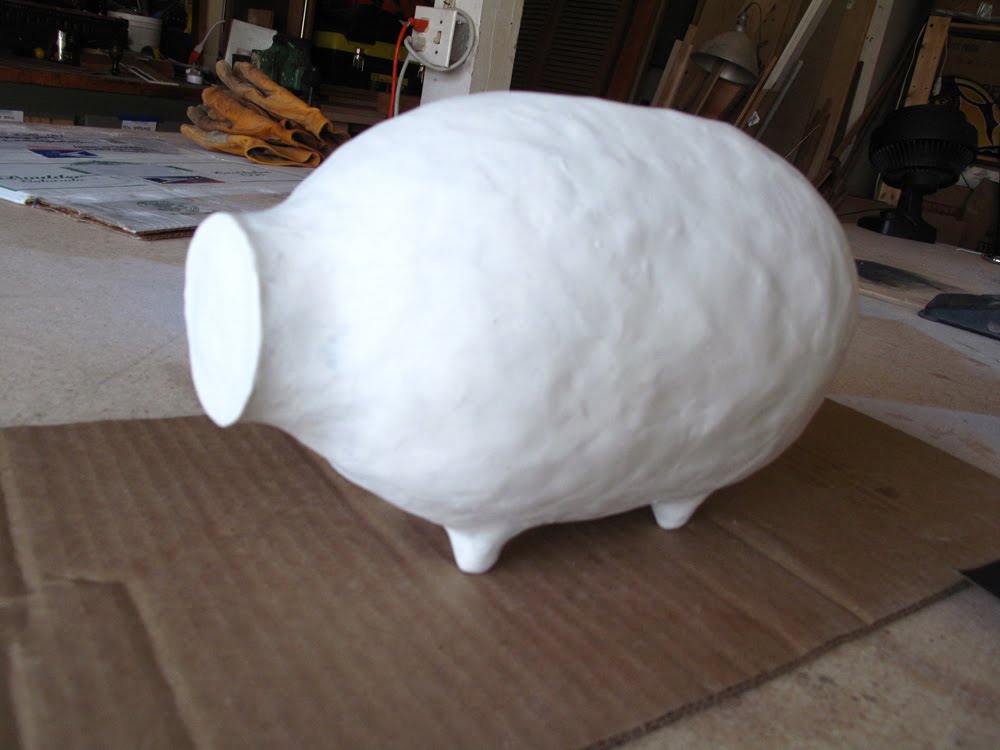 Then it was onto the sanding phase. My favorite!! Who doesn't like to spend HOURS sanding laboriously using sandpapers between 100 grit and 1200 grit...and on top of that, I also had to use Bondo to fill in all sorts of indents and fix all the cracks from the baking process since the Sculpey surface was so bumpy. Can someone remind me why I used Sculpey??
 After that it was on to the priming stage. This is where I had to spray the whole thing with primer, sand between layers, and repeat this step for 2 more times.
 And Voila! Here's the finished piggy model!
And you think after attending industrial design classes for 3 years that I'd know something about model making!! NOPE! If anything this proves that I shouldn't be making models!
Despite all that, I hope it was somewhat useful to see my process... Since now you know all my secrets and know NOT to follow any of the same steps!
So...now that we're done with step one...
STEP TWO: Prepare the master for mold making. 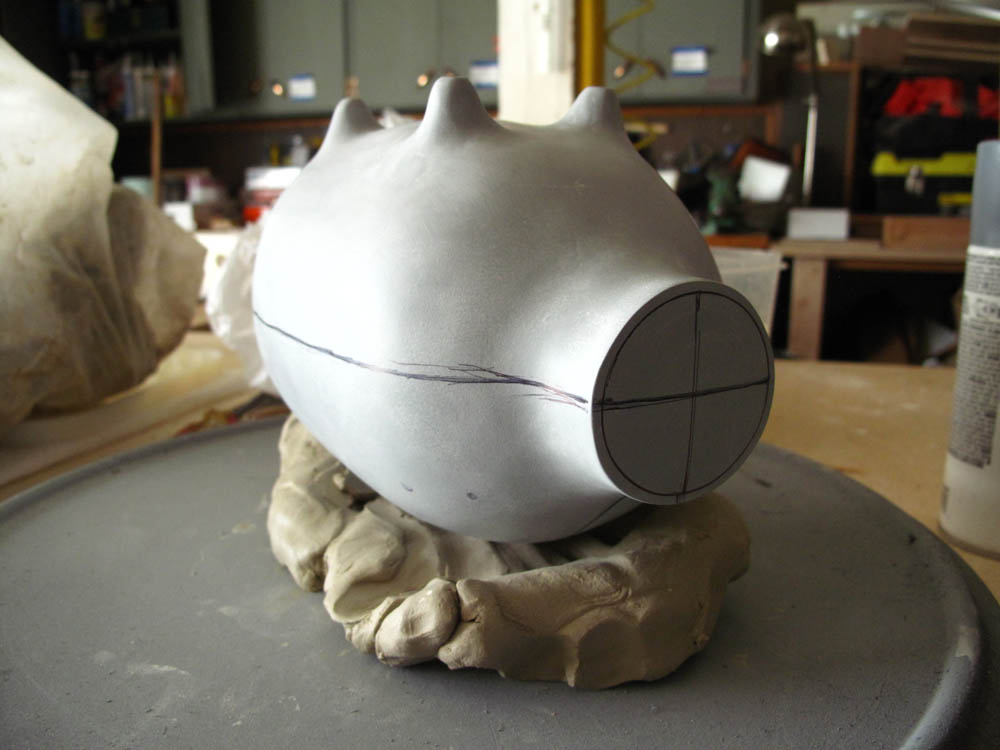 This was actually easier since I just had to carefully build up the first half with clay covering up to where the parting line is (roughly marked on the pig). It was critical to line up with the exact mid-point of the pig.
 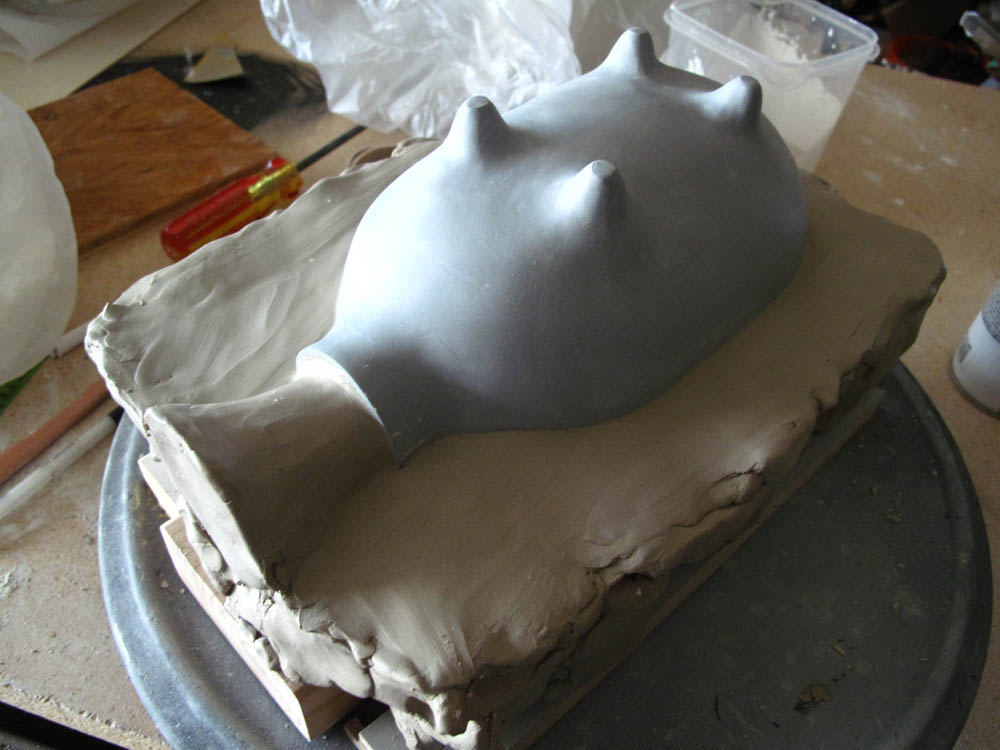 Then it I had build outward leaving about an inch and a half of border around. Lastly, the most essential part...a pouring snout that connects to the pig, which is an opening that will allow the slip to get poured in for the slip casting process.
 After all that, we then used these plywood pieces to build four walls around the clay form. The corners and edges all had the be sealed with clay so no plaster would leak out. The master shape also needed some mold soap so it could separate easier from the plaster.
STEP THREE: Pouring the plaster to make the actual mold!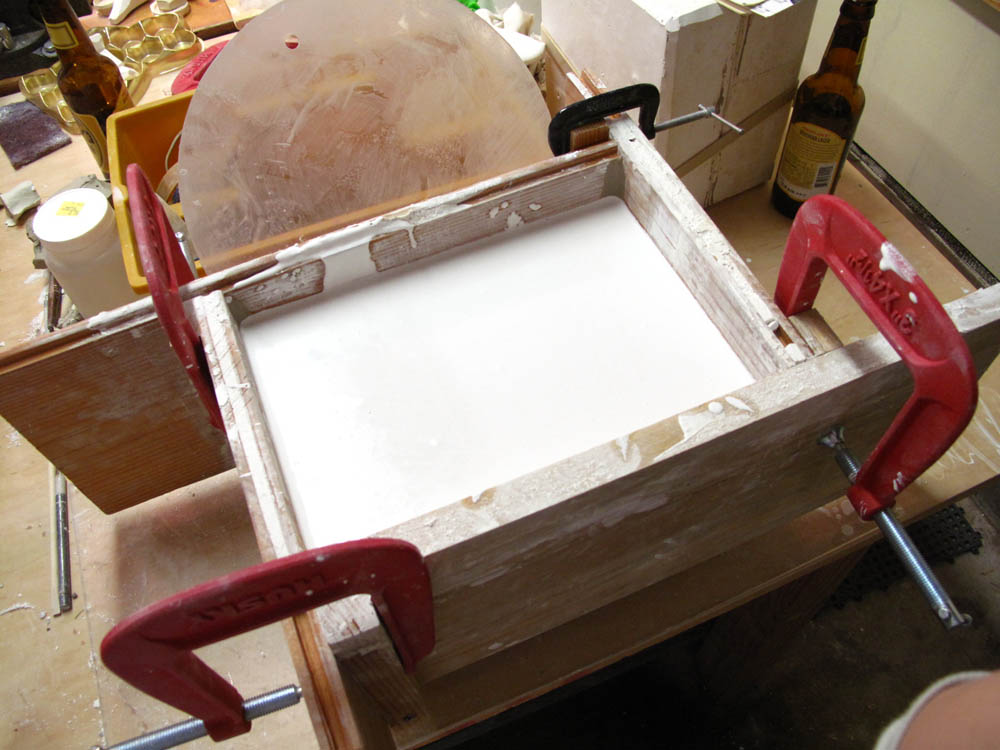 We used special slip casting clay (Plaster No.1) to make the mold. This involved measuring the volume needed and then following some equation of measuring out the 1/3 plaster to 2/3 water ratio. (Here's a WAY better instruction, HERE!) We then poured the mixed plaster in and then let it sit for awhile as it hardened and set. Once its hard, we took the walls off, leaving the master pig in the plaster...and then poured the other side in the same way.
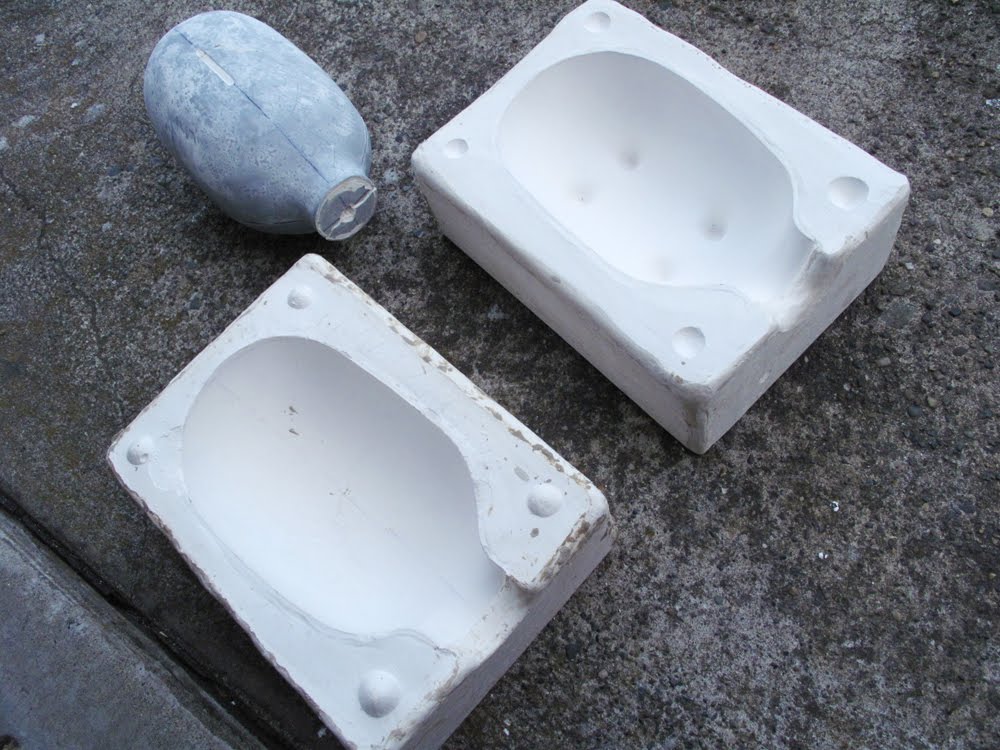 So this is what the two piece mold looks like! You can see the one on the right is the top half, and the one on the left is the bottom half with the feet. Even with all the mold soap-ing we did, the piggy was nearly impossible to get it out of the mold. So we had to use some major force and drill into the snout and pry it out...this made me almost want to cry after all the work that went into it!! But it was either doing that or leaving it stuck in the mold...so...not a whole lot of options.
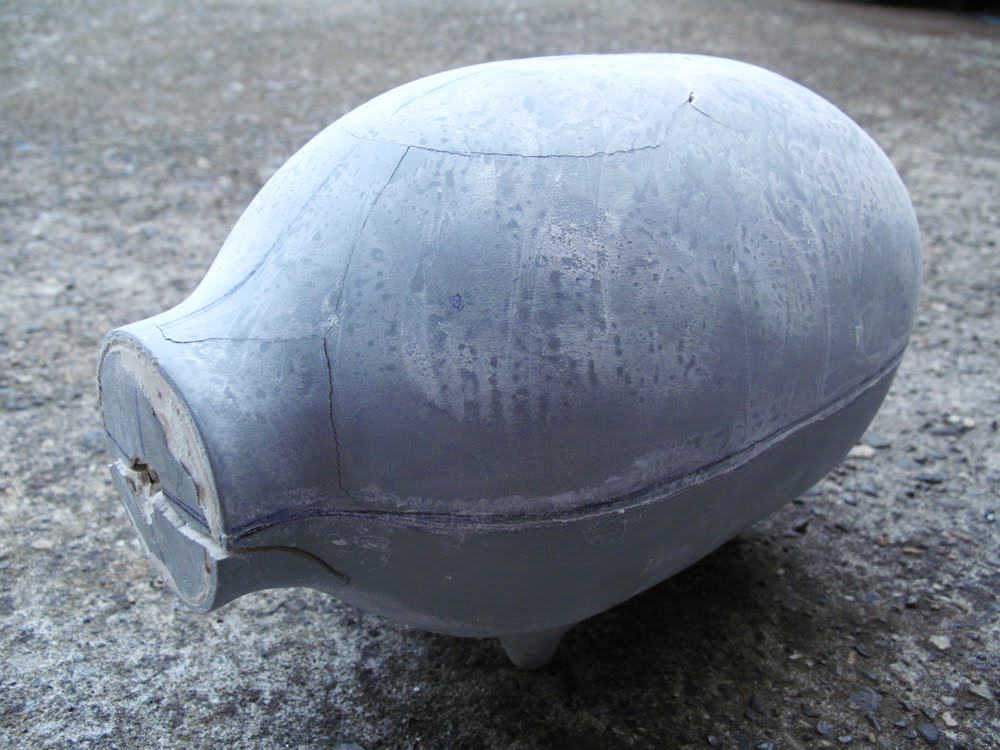 So this is what the master piggy looked like with all the cracks all over from all the abuse...not too happy looking. Unfortunately we won't be able to make another mold with this again. Sad...
See? TA-DA! It is easy as 1,2,3!
...It's just that every step required 50 intermediate steps that's all!
Of course this isn't the end of it!! We've still got to show you the slip-casting process and the finished products later!! Just be patient it's totally gonna be worth it!
We're very sad that 8 weeks of slip casting fun is over before we could even blog once about it, so here's a found look back (cue up "Will you Remember Me?" for a graduation-style slide show effect)
After months of much-effective harassment Jean, Chika, Jared, and I finally convinced our dear friend and talented ceramist Heath Bultman to share his skills and wisdom in the ancient art of slip casting. He was gracious enough to open up his tiny home studio and set it up as a classroom for the four of us. To the tunes of JT and Kenny Loggins we eagerly soaked up knowledge, plaster dust, beers, and jokes...not a bad way to spend a Tuesday evening. We started our class making plaster molds of existing objects. Mold making and mixing plaster is an art and science in itself, but with Heath's guidance we more or less successfully created castable molds of a few of our favorite objects.

Me pouring a bud vase made from an existing vessel.

From front to back: molds for Heath's lamp base, Chika's found "snake oil" bottle, my bud vase, Jared's potato mugs (he casted potatoes...what a rebel!), Jean's cork-topped canister.
Jean's handmade gem and mold.
 Jean used here thrifting skills to find this existing mold (above) for bear feet....or cat...or maybe racoon.
  Waving hello...
 Me looking satisfied with my cast piece.
We got more to come....hint. There's gonna be some original L&G piece!
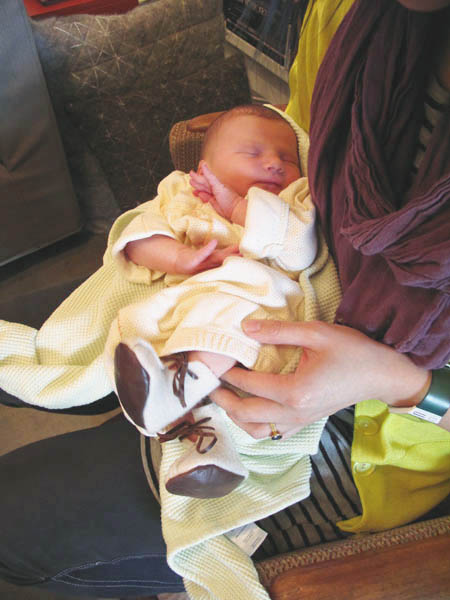
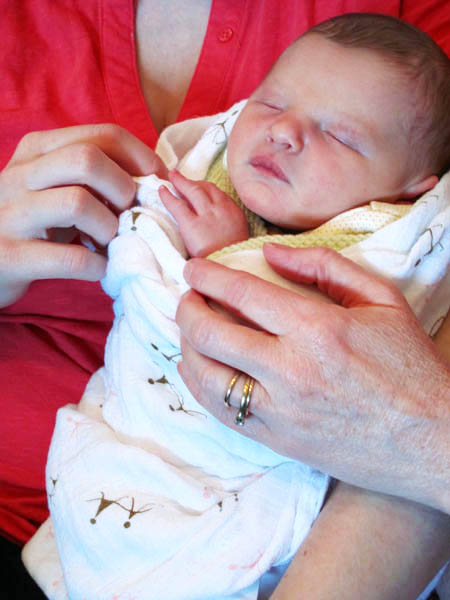 I posted about the little felt slippers I made for little Clara (the new addition to Piano Nobile)....and I just like to show you some photos of adorable Clara wearing them!
 Me holding her as Clara poses in her sleep...
 I love how she was totally fine with us messing with her while she's sound a sleep. I was even tempted to draw some mustache on her, too...but we decided not to go there....she might grow up hating me. :P
Our friends from Piano Nobile just recently added wonderful new member to the group! They just had their baby girl, Clara!! Although she'll take some training to do some printing and welding for them, but soon enough she'll be able to do incredible work just like Isabelle and Nick!
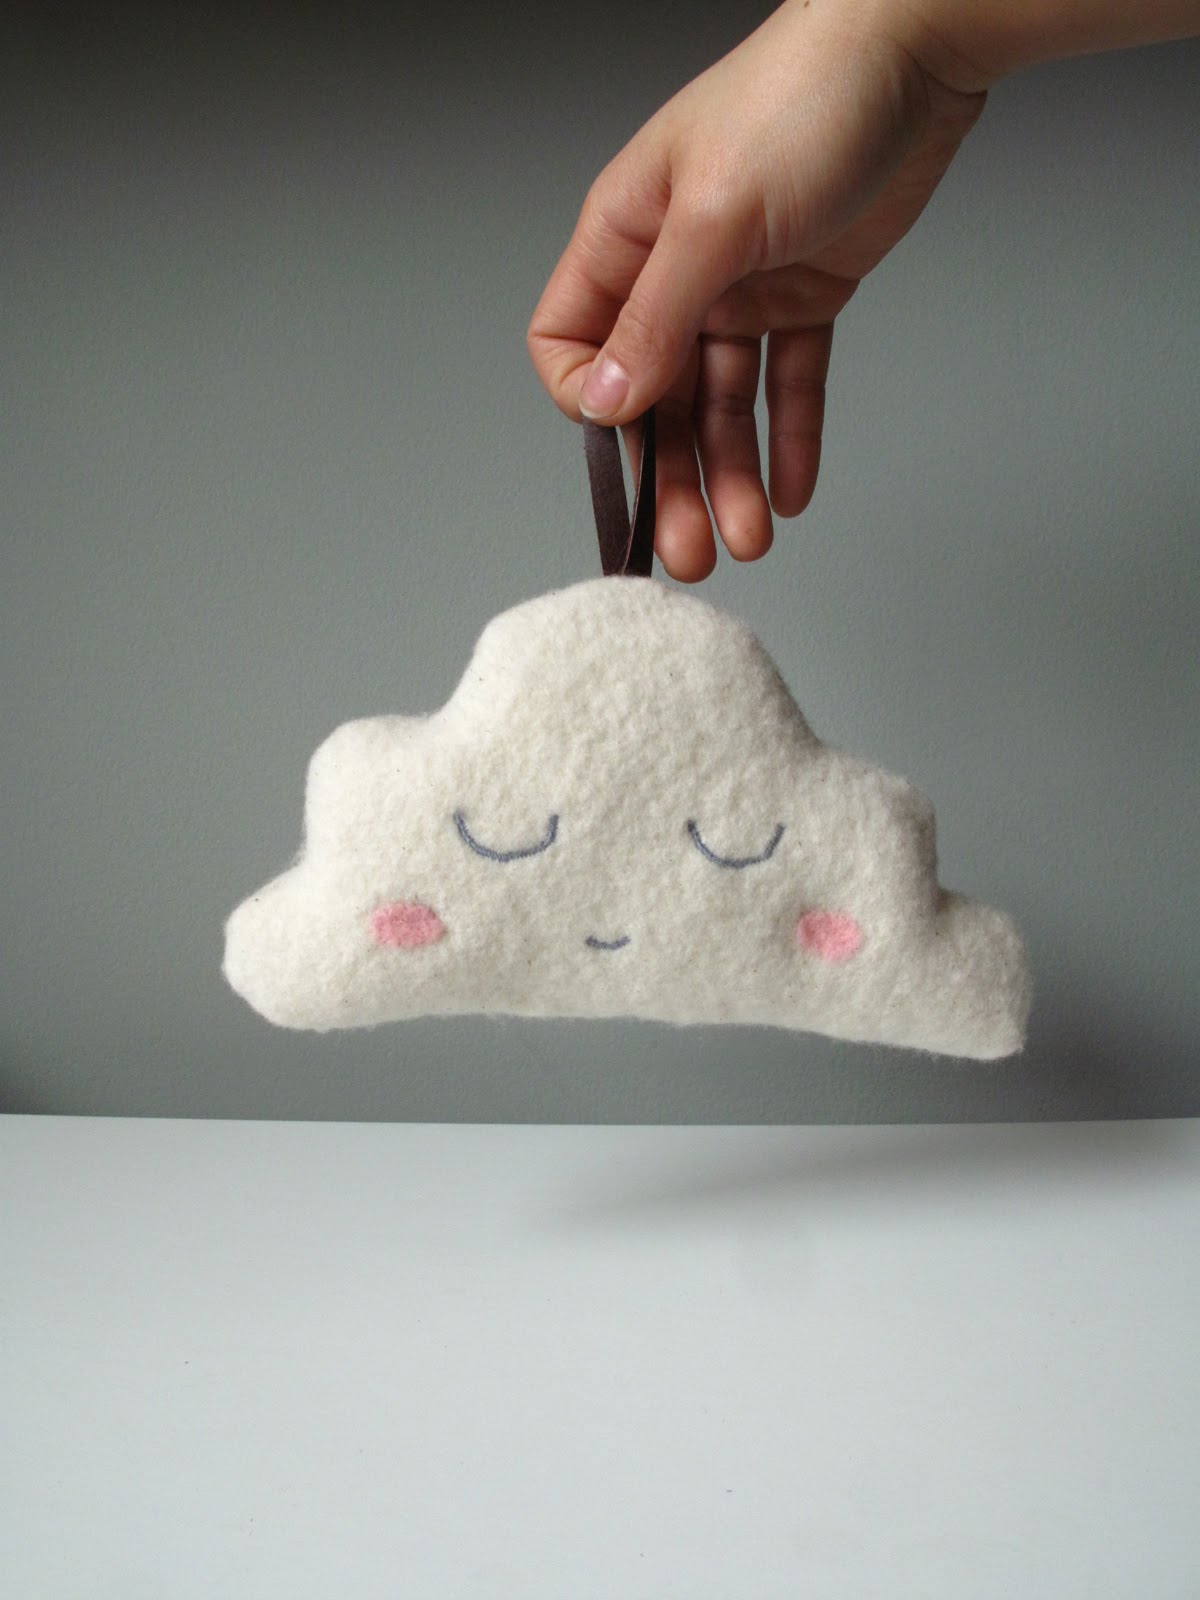 For Isabelle's baby shower, I ended up making a felt baby gift similar to the needle felted pillow I made awhile back.
I wanted to make something for them that they can keep even if Clara gets older.
The stuffed cloud can be hung above the crib and also doubles as a rattle toy....you know so little Clara can play with it or drool on it or watch it float above her head!
And since I'm so felt obsessed anyways, I also made her a pair of high-top felt & leather booty...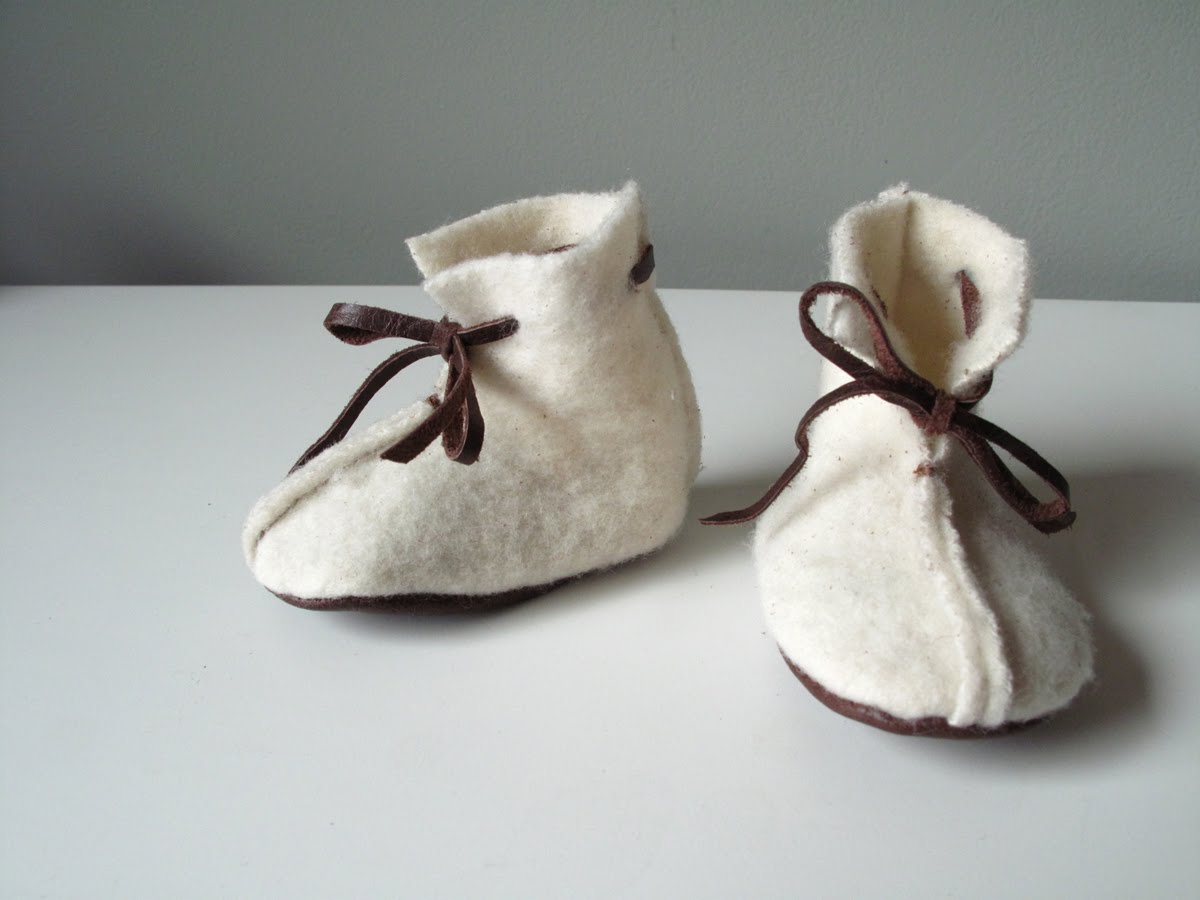 with the top folded down...for a more casual look.
 the leather bottom & lace
 All wrapped up for little Clara!
I'll have more photos of the little one actually wearing the boots soon!
 Recently, we took a big step (big for us) and got our very first retail order of the Chalk-It-To-Me Piggy Banks!! But boy do we really need to stop coming up with names that are way too long (i.e. Ladies & Gentlemen Studio..) It really bites us in the butt in the long run. :P
Perhaps I should start calling them CITM Piggy banks...ok, maybe just Chalk Piggies for now.
We're excited to share that they're available at the New Seasons Market in Portland, where 4 out of the 9 stores around the city are now selling these!! When we first got the order, we were stoked...but a little freaked out. We never gotten around in figuring out how to produce the Chalk series, but at the same time we didn't want to turn down the opportunity..
So Not only did we not have a production space set up, we didn't even we have packaging, print material, and all that stuff figured out. Don't worry, this is all part of our bigger picture "business plan" that we've drawn up in our own imagination.... so, yeah, we know what we're doing. :P
But we took our first stab at it...
 All packed up!
 This is by no means our idea of a perfect packaging design for these. I'd change pretty much everything if I have a dispensable income to make the packaging all fancy with crazy colors and would play music when you open the box like those cards with sounds!
What's better than trying to read a card with thoughtful messages from you family & friends while you're distracted with the cheap sounds of a button battery operated card that plays songs such as “Hot Stuff” by Donna Summer, “I’m Sorry” by Brenda Lee, “Satisfaction” by the Rolling Stones, “We’re All in This Together” by the cast of High School Musical?? I have an idea....how about a card that DOESN'T make any sounds so I can concentrate and read the card peacefully?
Anyways....sidetracked.
All and all, this was definitely an exciting first step to take and a great learning experience that gave us an idea of all the things we'd need to consider to take this even further.
Now we just gotta go work on our business plan!! Oh boy!
I wonder if the bank or investors would accept this as a business plan...
 Not only do I have a plan, I'm also showing that I'm a responsible saver with my piggy bank full of change! Booh-yah! Business plan DONE!
So around last August we briefly mentioned that Meg Mateo Illasco is working on some home decor book....but we forgot to mention that both Chika & I are also gonna be her book!!
Ok, you totally want to hear the whole story, right?
Well...let me tell you! It was a total serendipitous thing.....
It all happened on lovely mid-July day in San Francisco when Chika & I traveled there to sell our goods at the Renegade Craft Fair...... But this particular day was more than any other craft show days we worked at. We had the pleasure to meet Meg for the first time that day when she was doing book signing for her book "Craft Inc."
I decided to get a copy of her book to have her autograph it since I'm a big fan of her work and I love the book and wanted to get it for a friend..but instead of acting like my normal self....I some how turned into a giant dork too shy to say much besides looking awkward and mumbling some less than significant words like "uh..your books is, uh, really cool...yeah...I like how you talk about business...and stuff...but for crafters....uh...that's pretty cool...yeah, totally."
Well...those weren't the exact words..but I'm sure it was pretty close. :P
But of course, Meg was totally cool and SUPER friendly and just started asking me what I do...and as it turned out, Meg actually knew about our work!! AWESOME!
On top of what was already an exciting interaction with Meg, things just escalated from there. Next thing I know she was in our booth checking out our stuff and chatting with us as if we're already friends (I love friends!)...and JUST when I was thinking that things can't get any awesome-er..Meg all of a sudden says to me "Hey, I'm working on a home decor book and is looking for people to submit some creative projects with a personal story, you guys wanna do it?"
I looked at her like a deer in the headlight....then looked at Chika who also had the same look as me......I looked back at Meg and thought "Could this be real?!"....then realized I should provide some sort of response since she asked me a question....then finally I responded with great confidence "......yesssss?????"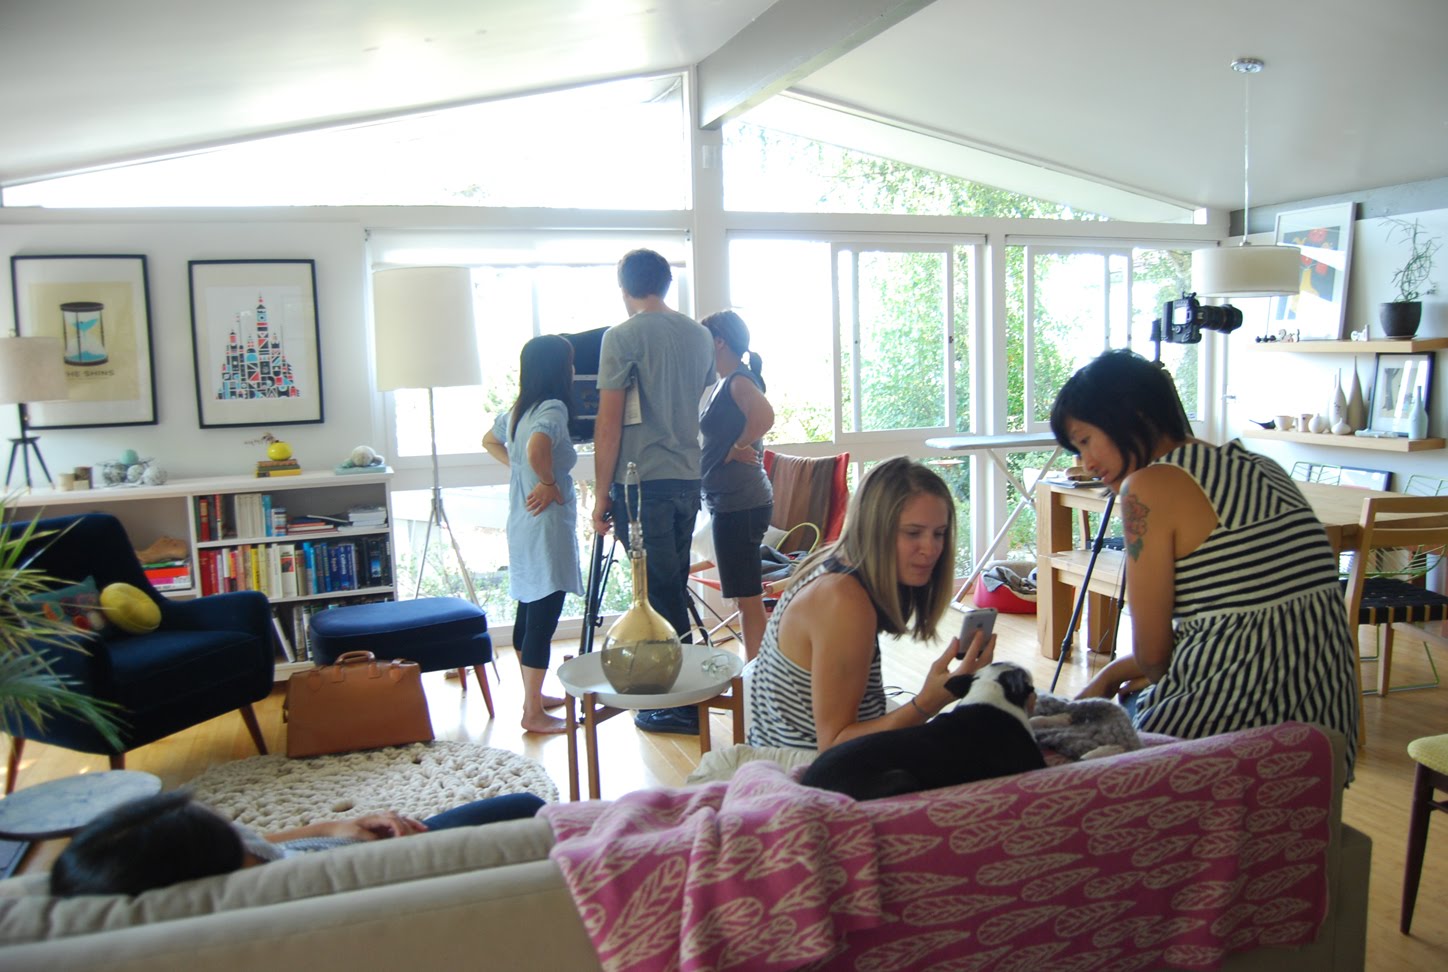
 I totally thought it was too good to be true and thought maybe she just wanted to feel it out and so I was prepared that at some point we'll get an email from Meg saying that she found someone better with a better project or for whatever reason.....but everything fell into place....and we realized it was truly official when both Chika & I went back in SF 2 weeks after we met Meg, and found ourselves hanging out at Lisa Wong Jackson's lovely mid-century modern house doing a photo shoot with Meg, Lisa, Joy, and Joanna with Thayer Alllyson Gowdy the photographer for the book. Everything happened so fast I couldn't even register it all!!!
 The book will consist of of 25+ other well-known designers/artists/crafters each with a DIY home decor project that has their personal stories or memories. We were thrilled when Meg told us all the awesome people like Joy from Oh Joy!, Lauren & Derek of The Curiosity Shoppe, Lisa Congdon, Lisa of Good on Paper, Cathy Callahan of Cathy of California, Tootie of ReForm School and more were all contributing to the book!
With a power group like that, I don't even have to know what sort of projects they are doing for me to just KNOW that this book will amazing!
Here's some photos from the shoot. I want to live in Lisa's house!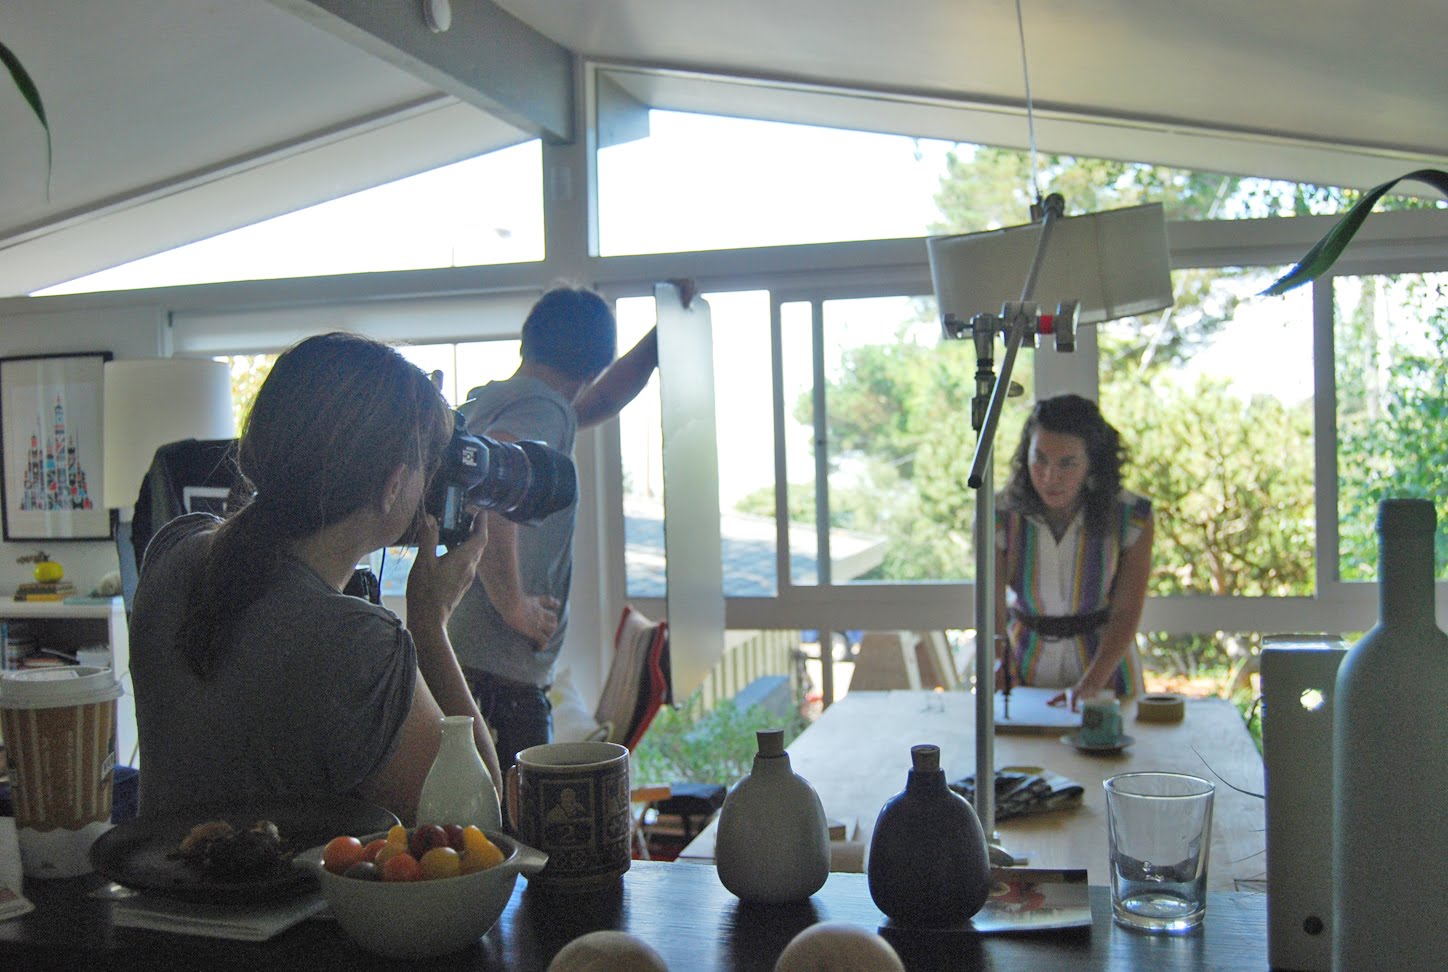 Lisa & Virginia (Meg's lovely assistant) in their matching striped shirt watching the photo shoot take place.
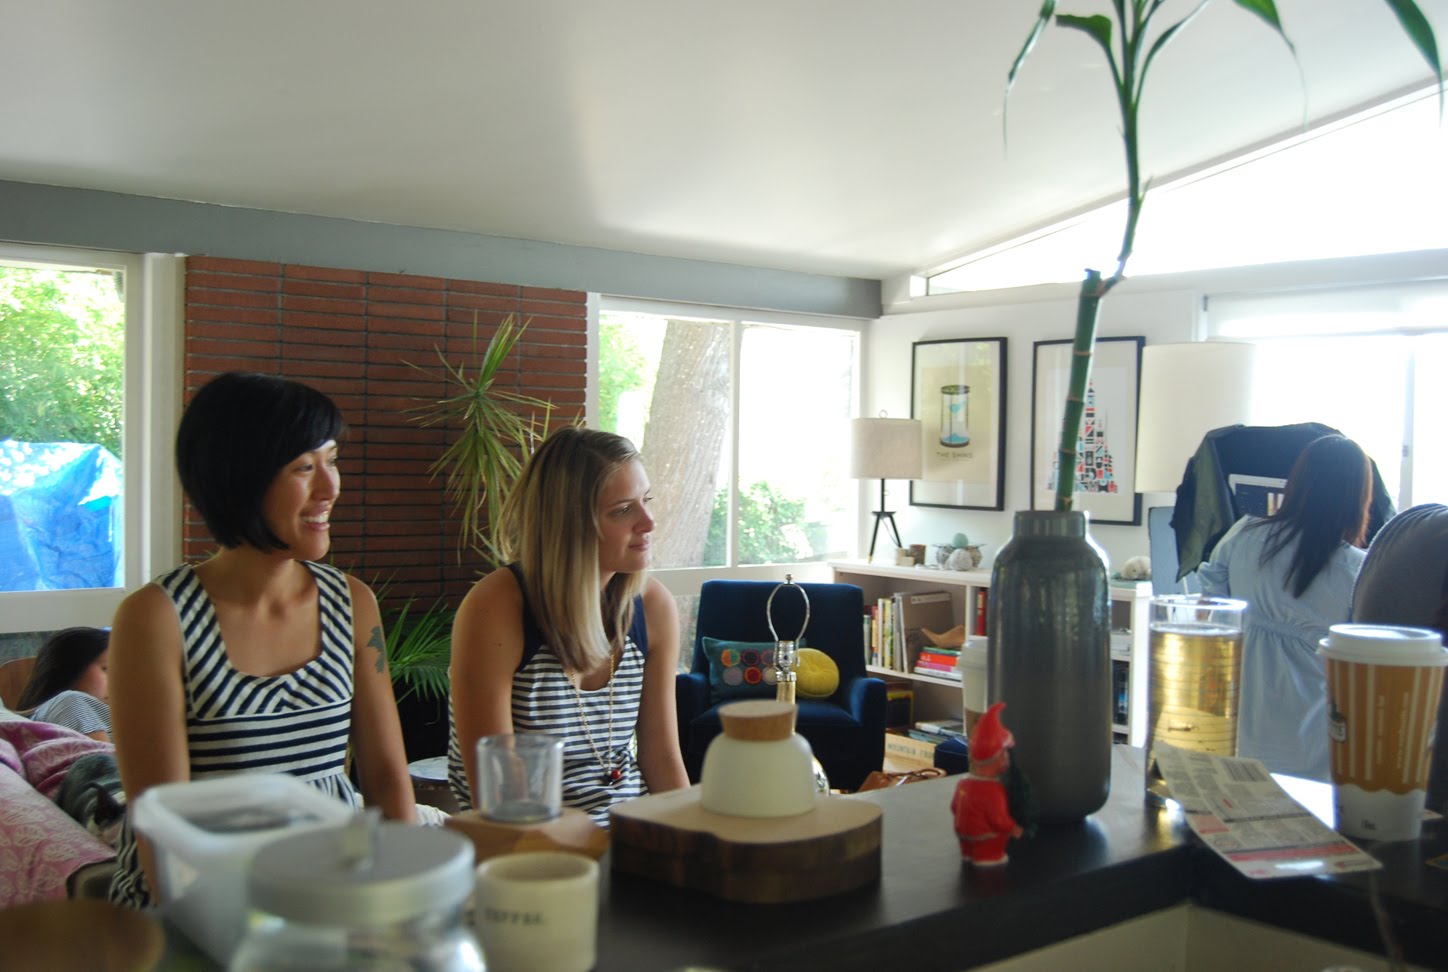 Below are the projects that got shot that day....
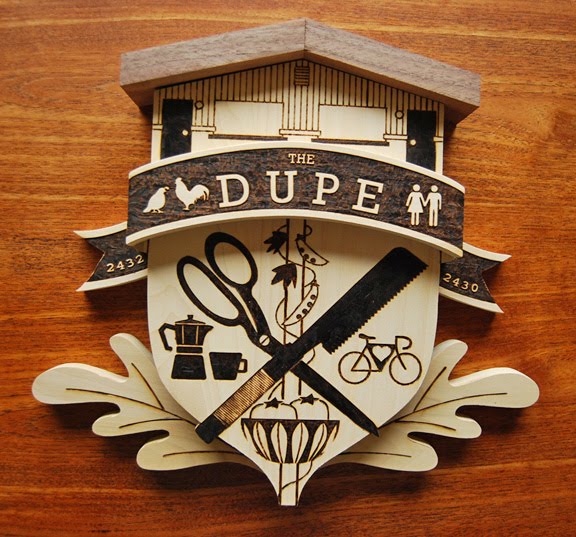
My Mega-Doily Rug....Oh how I wish my living room looked like that....it looks much better than my long skinny coffee table sitting on top of it...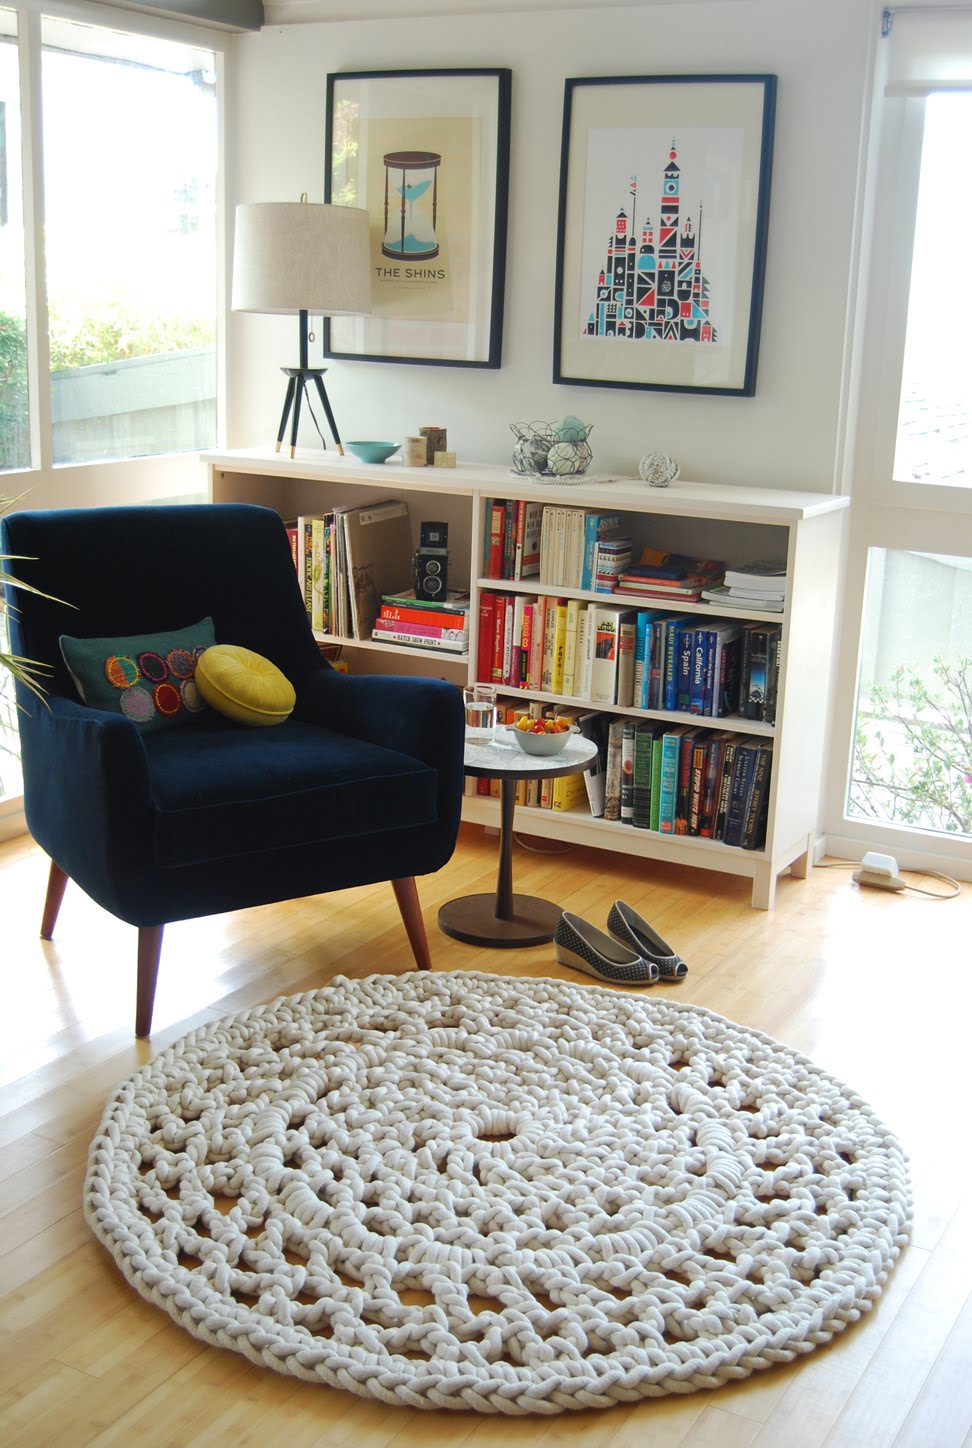 For Chikabird, we made a Coat of Arms for the Dupe with all the graphic icons that represented us and then we wood burned them!
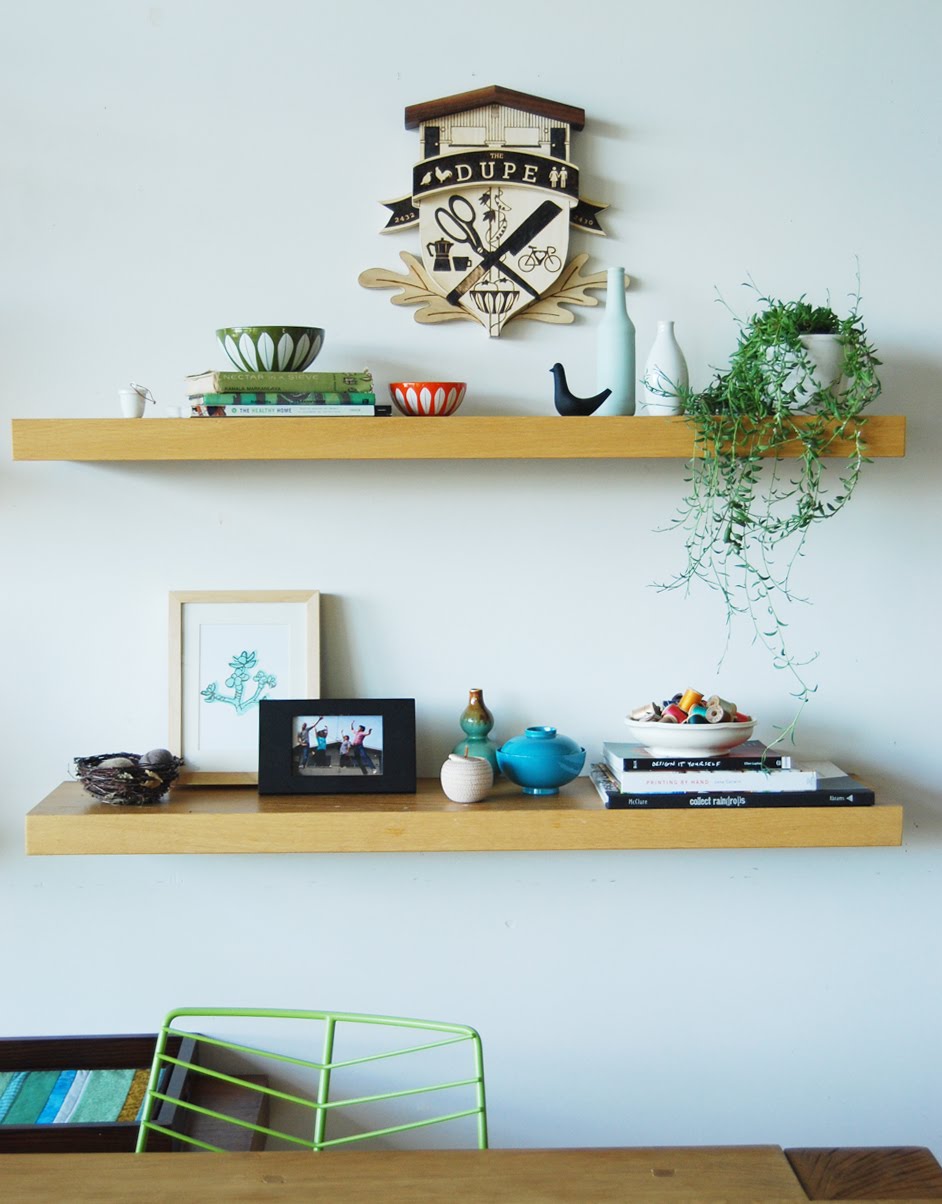
 Joy's beautiful gold leaf glass lamp
 Joanna's lovely stamped door curtain
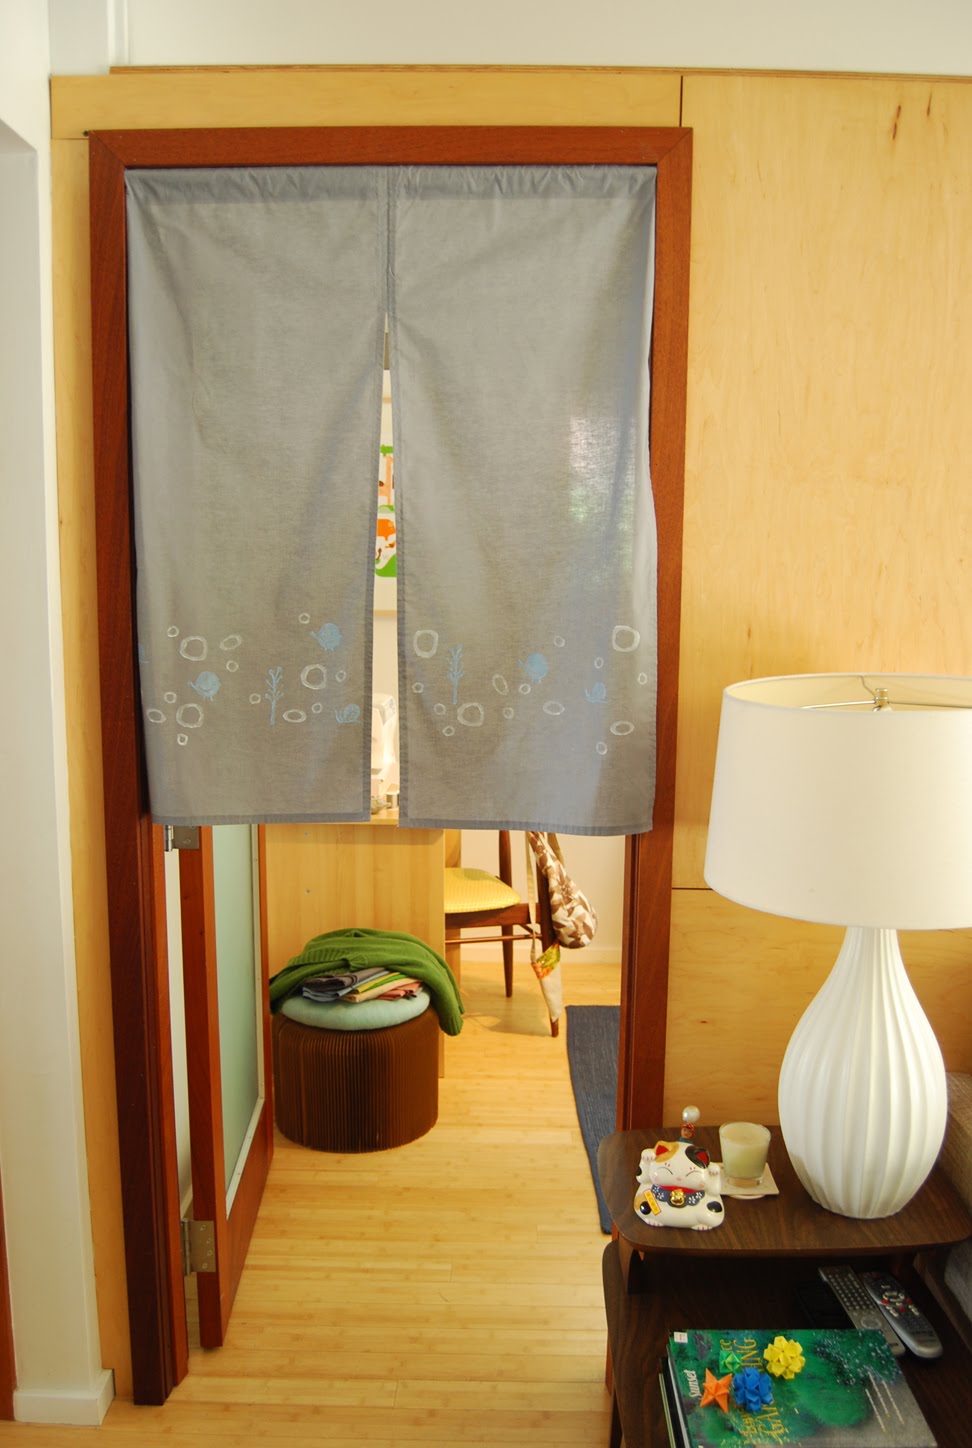 An here's everyone sitting down for a nice lunch break. It's amazing how exhausting styling a shoot is! There were lots of moving objects back and forth going on, standing back to look at it, framing the shot with our hands, tilting our heads, squinting, and then repeat....
 Yum yum almond croissants from my FAVORITE SF bakery, Tartine!!
 I still couldn't really believe that this whole book thing is actually happening even after several months in when we already done the photo shoot and submitted the instructions and story...for some reason I just feared (and was trying to prepare myself) that there would still be a chance that we could get edited out.....for simply looking stupid in our photos or something like that...but they decided to keep our project! Even though I wouldn't argue one bit that I probably do look a little stupid in the photos... :P
I'm just more than excited the fact that not only will this be our FIRST time getting published in a book...it's gonna be in a book by Meg along with an amazing group of people that we've always found inspiring, too!
There's just too much awesomeness all around! Can't stand it!
The real book is plan to launch this early fall!
Stay tuned!
This year, L&G is starting 2010 by sharing this little card we made for the New Year.
 We're looking forward to yet another exciting year, and plan to...
 and of course, there's always hopes to...
 I suppose that means we need to put that on our resolution and actually start playing the lottery. :D
But really, we'd like to be better about planing ahead this coming year and.... To explain....this past holiday season, I really dropped the ball in terms of sending out presents and holiday cards, and getting into the holiday spirit. I know...horrible. That's why we made these cards to make up for it. Hopefully that worked...
But for ourselves, we didn't even get a Christmas tree or put up any lights or decorations! We had the most non-holiday Christmas day where Dylan and I just roasted a chicken and made some stuffing....and didn't even bother making the gravy....I know...I can only imagine the looks that I'm getting right now...
We already got scorned by Dylan's grandmother when we told her what we ate. It was sacrilegious....
Still...we had our dinner with only chicken and stuffing and watched The Royal Tenenbaums in our non-holiday spirited living room. Despite our atypical Christmas day, it was still nice to just spend some time with each other and enjoy a nice homemade dinner by ourselves (let's just not dwell on the lack of gravy part...)
Sometimes I feel like its okay to just change things up a bit..right? We're not a Grinch, right? I think because we had such a low key holiday for 09', it'll be that much more exciting to go all out for this coming year's holiday and get a 20ft tall tree....where we'll have to lay that across our living room. That should be fun, eh? :D
We're looking forward to the new year and hope everyone will have an awesome 2010!
 Not sure about you, but I'm always a little behind on knowing what's new and awesome in Seattle...and for the fact that I don't hang out in Downtown Seattle nearly enough, I was REALLY behind in discovering this AMAZING shop/gallery called {far4}....a total hidden gem!
We first came across the shop when Jamie of Iacoli & McAllister mentioned it to us when she invited them to one of our JOIN shows. With the luck of such great exposure at the show, Jenny Klimenkoff who runs the store contacted us wanting to carry some of our Chalk figures! (there's our Mr. Rabbit in the window!)
 We were incredibly honored and excited to be in their shop, since they boast an amazing collection of the highest quality handmade housewares, art, antiques, and designs from all around the world. While it seems like a shop from NY, they're actually located in downtown Seattle with an open space and beautifully exposed brick wall that houses {far4}'s shop and gallery showcasing carefully curated selection of ceramic ware and art. (lucky us!)
With an unexpected mixture of objects of both great elegance and humor, I find myself mesmerized by every detail of every single item while feeling unsure if I should even be allowed to handle them!
Here's Jenny & Yelena behind the platter of hard-to-resist French Macarons from local Seattle bakery, Honore.
 A fabulous porcelain sculptures of a life-size monkey that reminds us a little bit of Jeff Koon's Monkey!
 Check out these realistic looking pea pods and flowers with paper thin petals from Klimenkoff Studio!! Holy
wow.....

 Ceramic doll heads on top of Iacoli&McAllister's Pedestals. Love the arrangements together!
 The patterns on the cups are made using only colors of the clay by Yusuke Aida....just incredible.

 LG is excited to finally present you our "Chalk It To Me" figurine series!
Remember when we first debut these at the Ctrl+Alt+Design show back in June? Well, it turns out that they were a hit, and we've started selling these babies in awesome stores like {Far4}, and Fancy in Seattle!
But don't fret if you don't live in Seattle, because now they're available for sale on our website! Feel free to raise your hands and go "Woo Hoo!"
 These are our first production run of cute ceramic animal pals with a chalkboard coating. Ready to be adorned by their adopted parents (aka. you!). The line up includes a piggy bank, a horse, and an over-sized rabbit. Each is handsomely finished with satin black chalkboard coating accompanied by our chalk kit with a felt rag and a pair sharpened chalk sticks.
 We'll be adding all sorts of figurines as we go, so check back frequently to our website and see what's available!
JOIN proudly presents:

11. 28. 09' SATURDAY
WHAT: ONE NIGHT ONLY pop-up shop featuring design objects by local artists and designers. Also a silent auction of AMAZING design items to benefit JOIN and Nest Seattle.
WHERE: Vermillion 1508 11th Ave (between E. Pike & E. Pine)
WHEN: 7-9pm Silent Auction
9:15 Auction Winners Announced
7-11pm Design Object Sale **Cash Only
WHO: Chikabird, Dinah Coops Design, fortyfive09, Fruit Super Design, Grain, Greg Bethel, Iacoli & McAllister, &c., Ladies & Gentlemen Studio, Meet Me Here, Piano Nobile, plainMADE,and urbancase.
WHY: To help benefit JOIN and Nest....AND to burn off some of that excess turkey weight.
Now is the time to start shopping for the holidays but also the time to start giving even for all the thanks you'll give over turkey & gravy.....we promise that you WILL be thanked...and maybe even receive a hug from one of us...if you want...your pick.  Here's a sample of what will be at the sale & silent auction! DON'T MISS IT!! It's the SATURDAY after Thanksgiving!
More about JOIN: Design Seattle
JOIN Design Seattle promotes emerging independent American design by providing designers a forum to show work, get feedback, and share resources. By organizing design shows and events and by hosting an online design event calendar and blog, we strive to be the adhesive and a resource that binds a thriving, but fragmented, furniture and product design community in Seattle.
More about Nest:
Nest Seattle is a nonprofit organization that provides micro-finance loans and mentoring to female artists and artisans around the world. Nest instills pride of ownership, preserves ancient artistic traditions and successfully moves women from poverty to self-sufficiency.
Here's a little exciting sneaky peak of some stuff that will be at fancy's SCRAP show.
I'm drooling already...
Opening night Tomorrow, Friday 13th. 6-9pm!


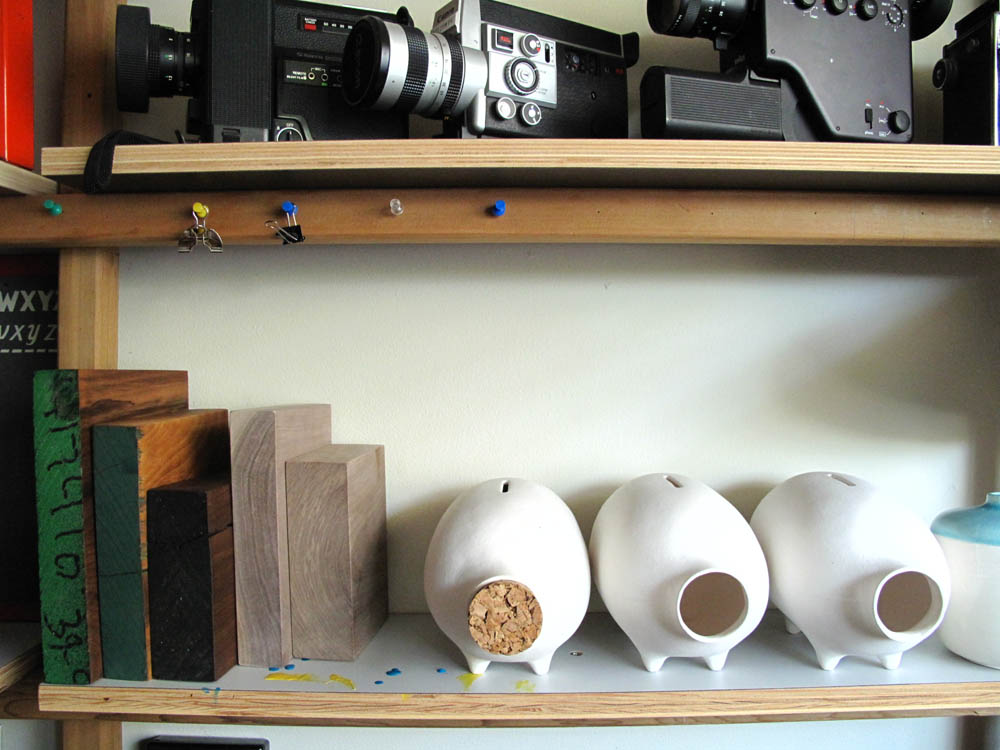
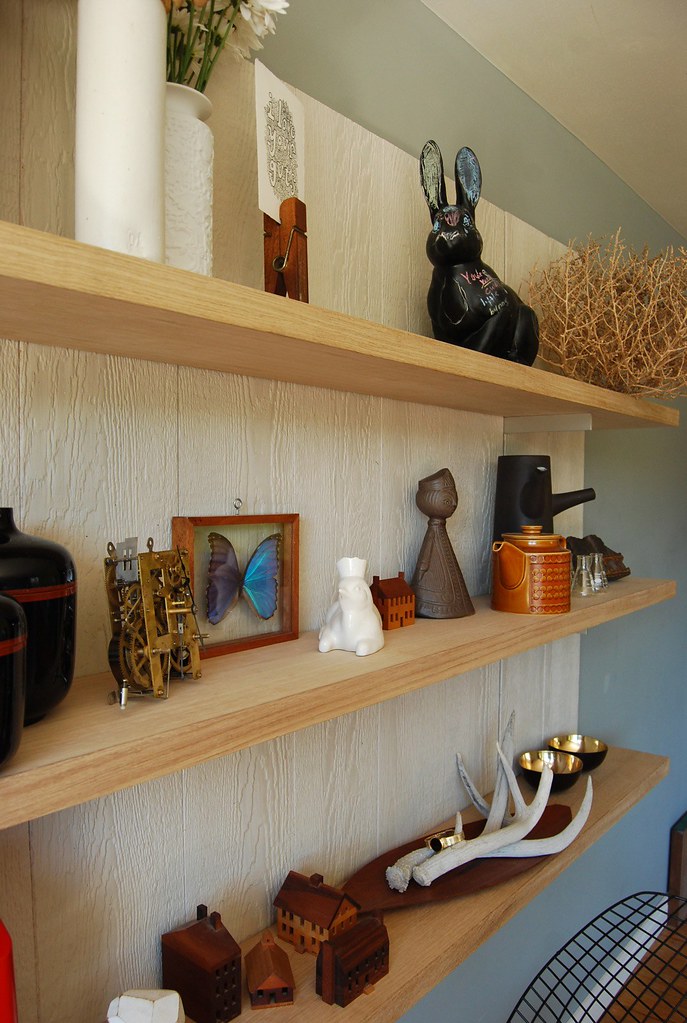
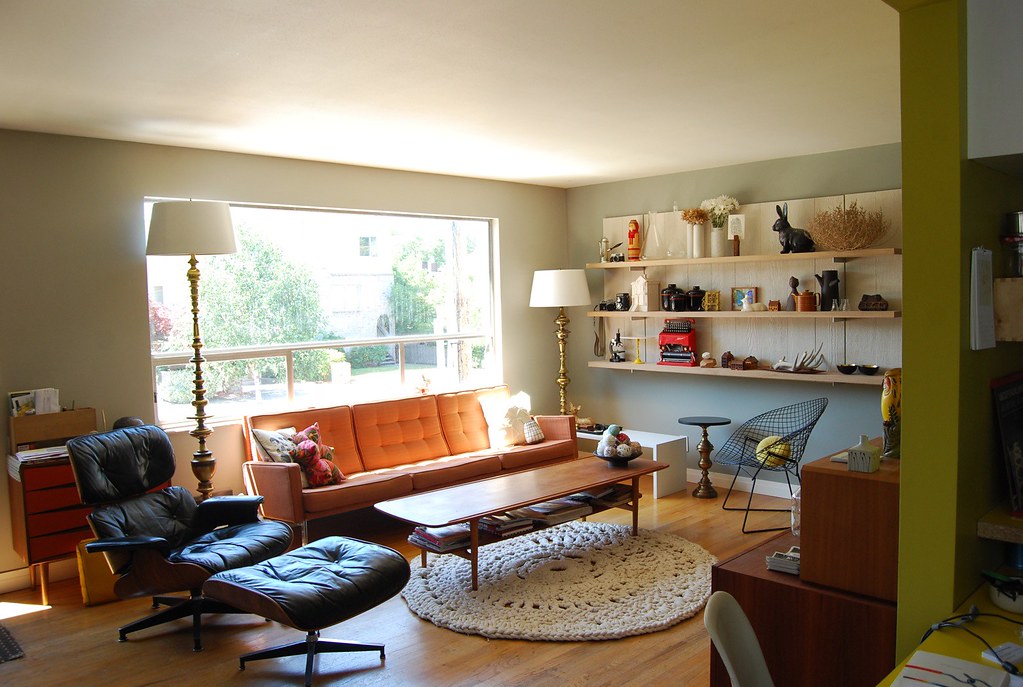
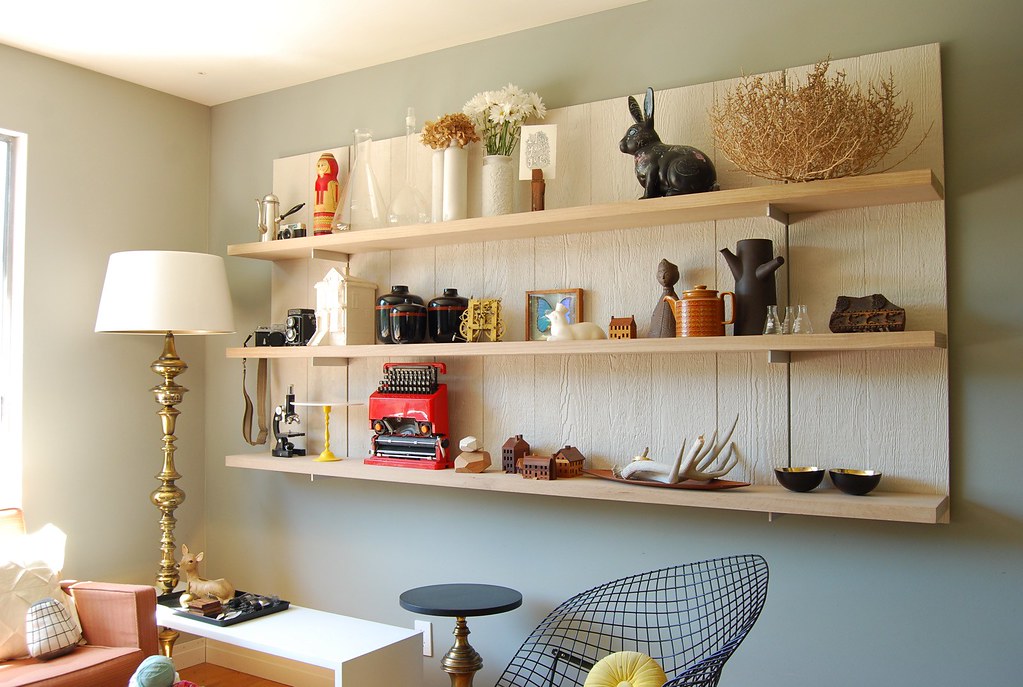
 2 more shelves done and I think I might not need the 4th one. Here are some pics installed with goodies on the shelves.
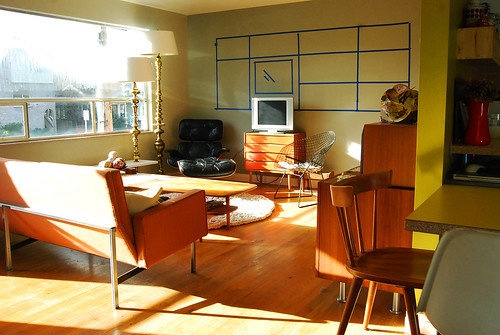 Above is a before shot with blue tape outlining the proposed shelving arrangement (the TV was originally going to go here). Months and months later the dream is nearly realized! Just have to figure out how to finish the shelves, but not change the color of the wood (I don't want it to yellow...any ideas?).
More on Flickr