Viewing entries tagged
dessert

Comment

Feeling the Holiday Itch

Since I got such a late start in actually working on holiday things for ourselves, I felt like I still needed to do something fun for the holiday
...and with the little time that's left to send out already late holiday cards, wrapping presents and making treats, I decided to cheat a little by cutting up these SUPER addicting Stroop waffle cookies to make them more festive & cute lookin'!!....plus I get to eat the offcuts. :)
Just perfect!


Comment

Comment

Black Sesame Macarons

I've been meaning to post about my experiments in making some black sesame flavored macarons after my first successful batch of macarons. These don't have the colorful charm that most French macrons have, but the taste is seriously out of this world!
You can get pre-ground black sesame packs at most Asian grocery stores. It's easy, you just have to memorize whatever character and proper pronunciation for black sesame depending on what type of Asian grocery store you go:
Japanese store, ask for "GOMA"胡麻
Chinese store, ask for "HEI-ZHI-MA" 黑芝麻
Korean store, ask for "HEUGIMJA" 흑임자
Cantonese store, ask for.....
Or you can just ask someone who can speak english or get it at any grocery store...that would probably make things a little easier. :PBlack Sesame Macarons recipe:
I got it from Martha Stewart, but altered it a little so the macarons arent' too sweet and won't get burn:

  • 1 cup confectioners’ sugar
  • 3/4 cup finely ground blanched almonds ( I get Bob's Red Mill pre-ground almond flour here.)
  • 1/4 cup finely ground black sesame
  • 6 tablespoons fresh egg whites (from about 3 extra-large eggs)
  • Pinch of salt
  • 1/4 cup granulated sugar
  1. Preheat the oven to 320 degrees. In a medium bowl, whisk together confectioners' sugar and ground almonds and black sesame. Sift it couple of times, so there's less clumping. In the bowl of an electric mixer fitted with the whisk attachment, whip egg whites with salt on medium speed until foamy. Increase speed to high and gradually add granulated sugar. Continue to whip until stiff glossy peaks form. With a rubber spatula, gently fold in the confectioners' sugar mixture until completely incorporated.
  2. Line baking sheets with parchment paper; set aside. Fit a pastry bag with a 3/8-inch #4 round tip, and fill with batter. Pipe 1-inch disks onto prepared baking sheets, leaving 1 inches between cookies. The batter will spread a little. Let stand at room temperature for 20-30 minutes until dry, and a soft skin forms on the tops of the macarons and the shiny surface turns dull.
  3. Double stack the tray (so it doesn't burn on the bottom) and then bake with the door of the oven slightly ajar held open with a water soaked wooden spoon or metal spoon. Bake for 5-6 minutes, turn the tray and bake for another 5-6 minutes if your oven bakes unevenly.
  4. Remove baking sheet to a wire rack and let the macarons cool completely on the baking sheet. Gently peel off the parchment. Their tops are easily crushed, so take care when removing the macaroons from the parchment. If it's sticking to the paper, spray the bottom of the paper with water. This will help peel it off easier. Use immediately or store in an airtight container, refrigerated for up to 2 days or frozen for up to 1 month.

Butter Cream Filling:
This is pretty much the same, make the butter cream and then add ground sesame. This yields more filling than the amount of macarons. So I take third of the filling, and mix half cup of ground sesame. You can save the rest for another batch or make different flavors with it.

  • 3 large egg whites
  • 1 cup sugar
  • 1 cup (2 sticks) unsalted butter, at room temperature, cut into pieces
  1. In the bowl of an electric mixer, whisk egg whites and sugar. Set the mixer bowl over a saucepan of simmering water and warm mixture, whisking often, until it feels warm to the touch and sugar is dissolved, 3 to 5 minutes.
  2. Transfer bowl to the mixer, and fit with the whisk attachment. Whip on high speed until mixture is stiff and shiny, 3 to 5 minutes. Add butter, one piece at a time, and continue mixing until butter is thoroughly incorporated. The filling can be kept, covered and refrigerated, up to 1 week. Bring to room temperature before stirring.
  3. To fill the macaroons: Fill a pastry bag with the filling. Turn macaroons so their flat bottoms face up. On half of them, pipe about 1 teaspoon filling. Sandwich these with the remaining macaroons, flat-side down, pressing slightly to spread the filling to the edges.
VARIATION: You can replace black sesame in the macrons with other ground-able ingredients like, coffee beans for coffee flavored macarons, or hazelnut flour for hazenut flavor, or poppyseed for that poppyseed texture! Have fun and experiment!


All this talk about macarons is making me wanna make them and of course....eat them too! God. I love them!!


Comment

5 Comments

Dylan's Blast From The Past Birthday Cake

For Dylan's birthday, I put together this strawberry birthday cake....
I said put together, because I didn't actually bake the cake. I was lazy....but still wanted to make it seem like a "special" birthday cake.
So I went to the store and got a chocolate angel food cake, some fresh strawberries, and heavy whipping cream. (told you I was lazy.)

My vision: Make a light tasting cake that mimics Asian cakes.

My plan: Slice the cake into three layers, put some whipping cream and sliced strawberries in the middle. Put icing around it and some decorate with strawberries.

My outcome: An unintentional Betty Crocker style cake from the 50's....I didn't realize it till I saw the photosl!! I had it in my head that this is simple! (simple to do..making it pretty, was a different story) I worked on it, the cake got more out of control. (out of MY control that is...) The cake was too fragile and crumbly, and the whipping cream didn't have enough structure either to ice around, so I had to improvise and dabbed the slightly liquidy whipping cream on top...and made some intentional-looking drips...Then in the attempt to try to hide the ugliness of the icing, i decided to put some whole strawberries on top....and voila! A "special" ugly-looking cake for my special man!

So, now you know the secret of making an ugly & unappetizing cake that looks like it traveled from the 50's, what are you waiting for?! Go make an uglier one so I'll feel better about mine!

*The bright yellow counter is our new kitchen project (will blog later)...the yellow definitely amplified the whole 50's look....heh.


5 Comments

8 Comments

Success! I Mastered the French Macarons!!

After my first attempt in making some French macarons last week, I made another batch...and this time without Dylan's "help." and what do you know??....it was a TOTAL success!!
I decided to experiment with making coffee macarons with Irish cream filling. And I have to say....It was AWE-SOME!!! (other people agreed with me.. just so you know, I'm not making this up) Will...I'm sure some real Macaron conisseur would disagree and nippick them, but I was happy with how it turned out as it was only my second attempt in making them!

So Check it. This time, I made sure that ALL the ingridents got mixed. I beated the egg whites to a shiny stiff peak, I replaced a quarter of the almond flour with finely ground coffee beans and carefully folded in with the egg whites.
I piped it and it actually looked like how it's supposed to..stiff and shiny! Coco&Me has step by step photos of how they're supposed to look like, which is super helpful for a visual learner like me.
Then I put it in the oven..and I discovered something new that's different from what Martha's recipie said to do. I actually set the oven to 325degree instead of 350. And left the door slightly open...you can use either a metal or wet wooden spoon.
I baked it for 5 minutest first and then turned the pan, and then baked it for 5 minuets more and it was perfect. Martha said to bake it for 15 minutes, which I feel like it would of burned it...I also placed another pan on the existing pan, so no direct heat was burning the bottom of the macarons (this was not mentioned in Martha's recipie) Sorry Martha, I have to disagree with you on this one! I think every oven heats up differently, but it's better to bake it for less time to check on it before it's too late. And Voila! I got the so-called "foot" where it's slightly crusty on the bottom edge and the top is smooth and round...they're so cute!
So ta-da!! My successful batch of delicous macaroons! I was so happy with them that I was jumping all over the place yelling "I did it, I did it!" I felt like I was a scientist or something....except I didn't invent anything great...okay maybe that's not the right comparison. I feel very accomplished nonetheless. :)
Every batch only yields 16-18 or so, which is not enough to go around when they're so small and easy to just pop in your mouth. Now I just need to be able to make multiple batches with various colors and flavors...
Here are some flavors I'm thinking of expereimenting with...
Black sesame
Matcha with redbean cream
Lemon with ginger cream
Cinnamon with chocolate ganache (like mexican chocolate)
Lavender with lemon cream
Cardamon with carmel cream
Hmm....the possibilities are endless. Any other ideas??


8 Comments

6 Comments

I Love & Hate You, French Macarons! But Mostly Love...

Ah..French macarons....oh! oui oui...how I love thee. I mean, who doesn't, right? They look and taste like perfection and heaven in every way.
I've been wanting to make them. But every time I start reading about how to make them, I always just give up before I even try....fearing that I would fail miserably. I read all the warnings, the unsuccessful stories, and the mixed approach and opinions from friends who made them, blogs, food forums, and so on. It's been a year or more of thinking about this and I've yet made them.....
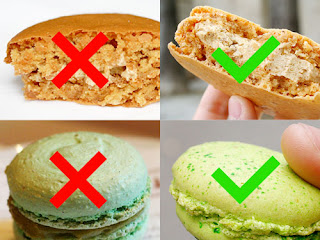
But I'm tired of being scared of these macarons! I finally decided to confront my own fear by approaching it with an entirely new mentality....and that is...."I'm going to fail and make the ugliest French Macarons ever!"
Yup! This is my way of setting the bar super freaking low and actually expect something to go wrong in the process.....I'm totally gonna screw it up and it's gonna be great!! no shiny smooth surfaces, no perfectly round dome, no 'foot' on the bottom, no chewy texture....I'm just gonna try it and if I achieve even one of those things listed?? That means I did something right...

I did my share of research...and got some great tips and tricks from Coco&Me, Syrup And Tang, Serious Eats, some Forum and of course Martha for all the things I need to know to prepare myself a little bit.

So I followed the tips to sift the almond flour and confectioners' sugar couple of times....I mixed the egg whites without over beating it...I folded in the dry ingredients carefully without flattening the batter....I left enough space between the macarons.....I let the piped macarons sit for a little bit....I doubled stacked the trays so the bottoms don't burn....I left the oven door slightly open.....
Check. Check. Check.
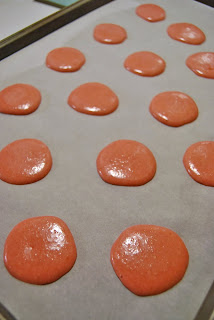
Then I look over to the counter....there was one little bowl with some ingredient still remains....it was a quarter cup of granulated sugar that I had forgotten to put in!!! OMG!!! Serious!?
I threw a total hissy fit since Dylan was supposed to read the steps to me...It's complicated..... okay, well... he was using the computer, and I didn't want to kick him off the computer entirely and just thought that he's CAPABLE of reading at least straight from the recipe that's right in front of him!!! I trusted him! But NOOOO, he said because he was multi-tasking on the computer, he was too "distracted", and didn't mention to throw in the granulated sugar while I was making them!!!
I thought I had mentally prepared myself for failure in making these macarons...well, I did...I just didn't prepare myself to loose my faith in MEN!! That'll be the last time I ask him to follow instructions or any cooking recipes! GAUWWWD! (roll my eyes...)
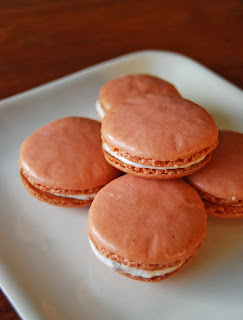
But I decided to bake them anyways, just so they don't go to waste. And it turned out that they had an itty bitty little structure remained....as you can see that they're a little flat, but it's something. And the result was actually....not bad! I made 18 of them...and only 4-5 of them looked half way descent. So...here's to my very FIRST batch of macarons!! I went with the rustic look...
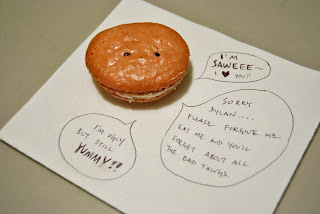
Then I used one of my more "charming" macaron (I put black sesames as it's eyes to make it have sad eyes...) to tell Dylan that I was sorry for getting pissed at him the next day.... Dylan ate the little macaron guy and was happy again. He's easy like that. :)

I think I'll make another attempt soon now that I've conquered my own fear. So much for the year of mental preparation and then somehow ended up putting our relationship on the line...and all because of these damn macarons!! I hate you for being so difficult! ....oh! I'm sorry...I didn't mean it!! I'm saying things that I don't mean.... You're so tasteful and delightful!! I love you, macarons!


6 Comments

7 Comments

My Dream Man!

FINALLY!! The moment I've been waiting for....Beard Papa is in Seattle!!! I've been dreaming about him ever since my unforgettable encounter with him in Japan when I studied abroad there in 2003....Oh! how I still remember it like it was only yesterday! I don't talk about Beard Papa to Dylan much.....since he gets jealous. But it wasn't 'til now that he came to understand my obsession with him.
Last weekend, we went to Uwajimaya by the food court, and from the corner of my eyes, I saw this BRIGHT yellow & white booth with Beard Papa's adorable face and a whole table covered with beautiful golden cream puffs!!If you don't know about Beard Papa, you should watch this animated story which will explain everything. Beard Papa is a Japanese franchise that started in Osaka, Japan. Not only is Beard Papa super cute and kind, he also makes the BEST cream puffs...actually WORLD'S BEST! They have great texture and are not too sweet or heavy. I love Japanese sweets for that fact.
For mere $2.75, you can get these delicious cream puffs with the perfect outer crust and creamy filling that are freshly filled right when you order! Their Choux pastry puff is this brilliant well-engineered patented TWO layered crust with crunchy texture on the outside and soft within. Their original whipped vanilla custard cream is a classic. They also have special flavors like green tea, strawberry, chocolate, earl grey where they change it up everyday.
I think even Dylan is in love with Beard Papa now. :D


7 Comments

4 Comments

Summer Cheer with Molly Moon's Organic Ice Cream


I'm very excited to share with everyone about this new local Seattle creamery shop that recently opened up in Wallingford neighborhood, called Molly Moon. This has seriously been one of the great highlight for summer 2008. Molly Moon is the owner and creator of this stylish gourmet ice cream shop and is very proud (as she should be) to share that she uses all organic and local ingredients from Washington and 100% compostable bowls and spoons! How awesome is that!? Molly offers a great selections of unconventional and classic flavors that people of all age can enjoy. I couldn't control my curiosity, so I jumped on test tasting most of the exotic flavors such as the salted caramel, balsamic strawberry, cardamom, honey lavender, and thai ice tea...I was totally holding up the line, but I couldn't help it!! They were all SO good! Even the chocolate was excellent, rich creamy chocolate flavor where you can still taste the subtle bitterness of cacao....flavorful yet not too sweet.They even make their own waffle cones! as you can see the boys anxiously waiting for their homemade waffle cones...I was behind them watching them make it as well. Mmmm...drool.

With Molly's creative spin on her ice cream shop combined with her French Bulldog/Boston Terrier's cute puppy face on the logo, they've already created a huge sensation and buzz in Seattle ever since they opened. It's only a matter of time before they conquer the rest of the world with their irresistible charm.

Molly Moon Ice Cream
1622 ½ N 45th St
Seattle 98103


4 Comments